Azure-devops服务器搭建
先下载 Azure DevOps Server 2022.2,地址:
https://learn.microsoft.com/zh-cn/azure/devops/server/download/azuredevopsserver?view=azure-devops
注意:Azure DevOps Server Express 是免费的,可在客户端和服务器操作系统上设置,并支持与 Azure DevOps Server 相同的所有功能。唯一的区别是,它受许可协议限制为五个或更少的活动用户。
系统安装
系统安装包括了 Azure DevOps Server Express 应用安装和 Sql Server Express 数据库安装两部分。这里就不多说 Sql Server 的安装了。我们直接讲解 Azure DevOps Server Express 2022 的安装。
注意:Sql Server 是强制依赖项,必须先安装。
都是傻瓜式的安装,如下图:
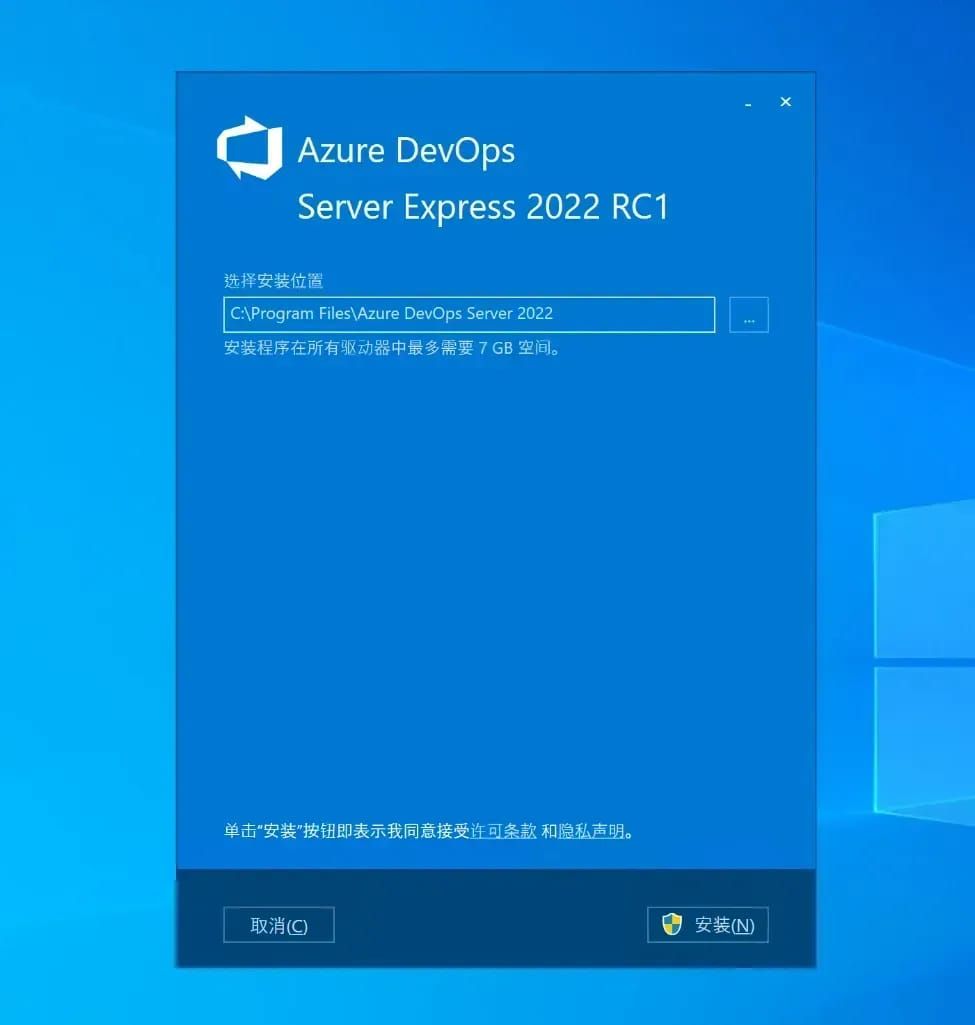
等待安装完毕后,重启系统。
启动配置向导
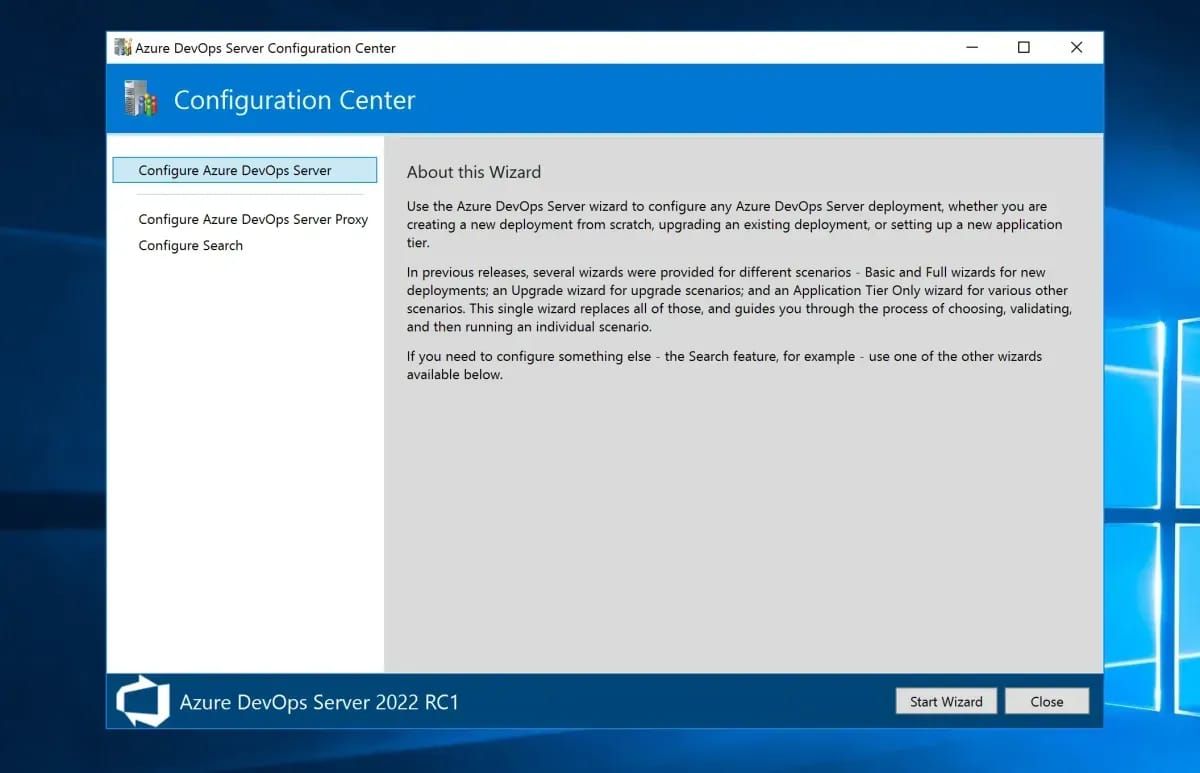
重启系统后,会自动弹出配置页面,如下图所示:
我们直接点击 "Start Wizard" 开始配置
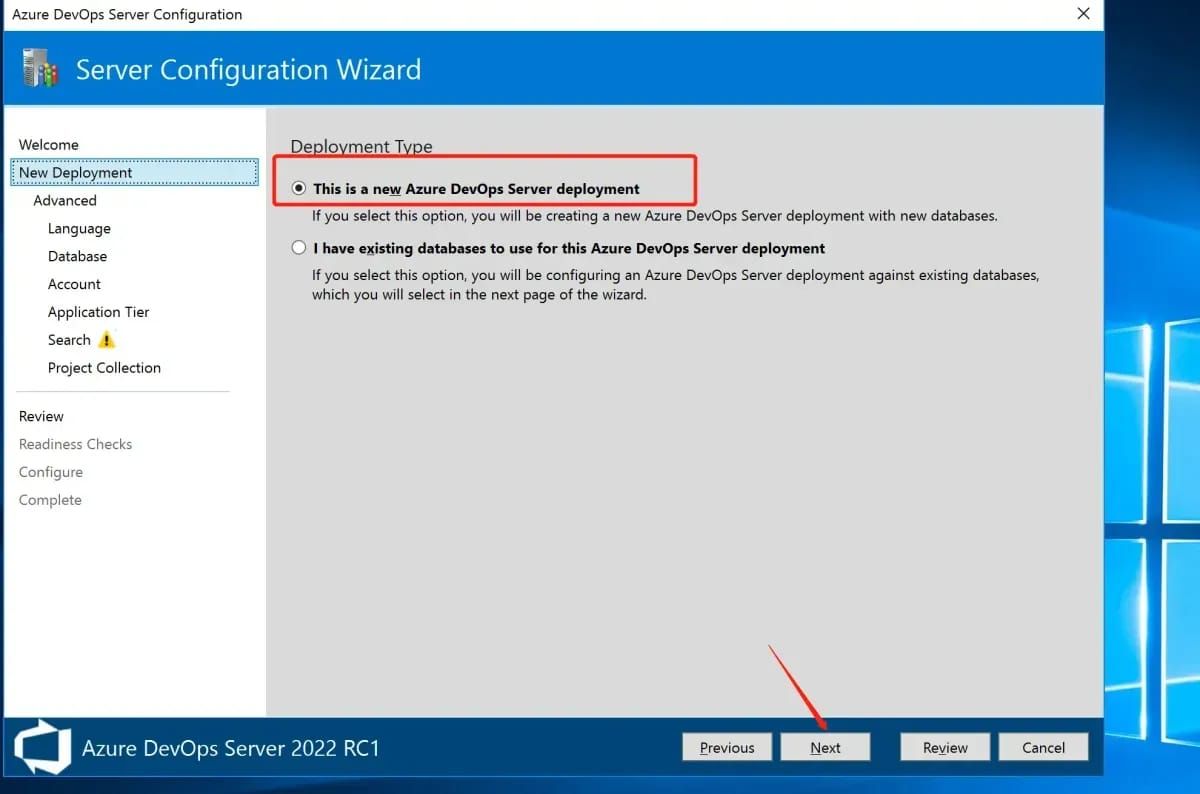
选择 "This is a new Azure DevOps Server deployment",点击 "Next" 下一步
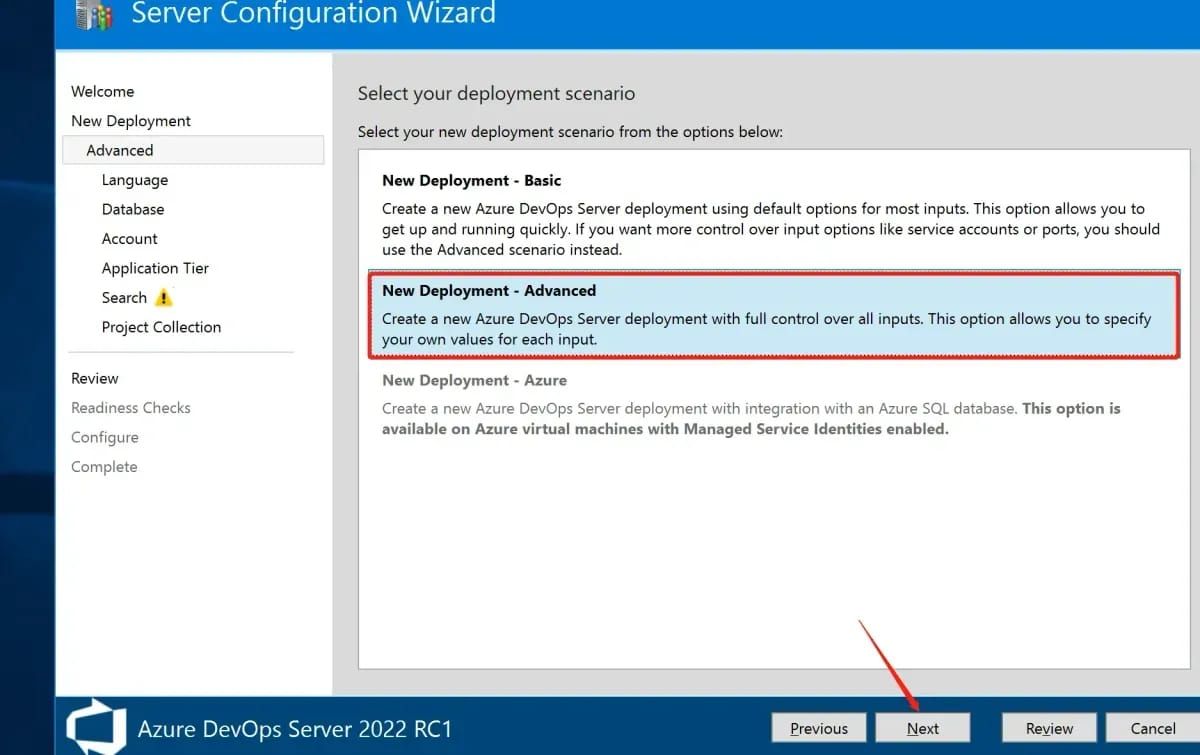
默认选择 "New Deployment - Advanced",下一步即可
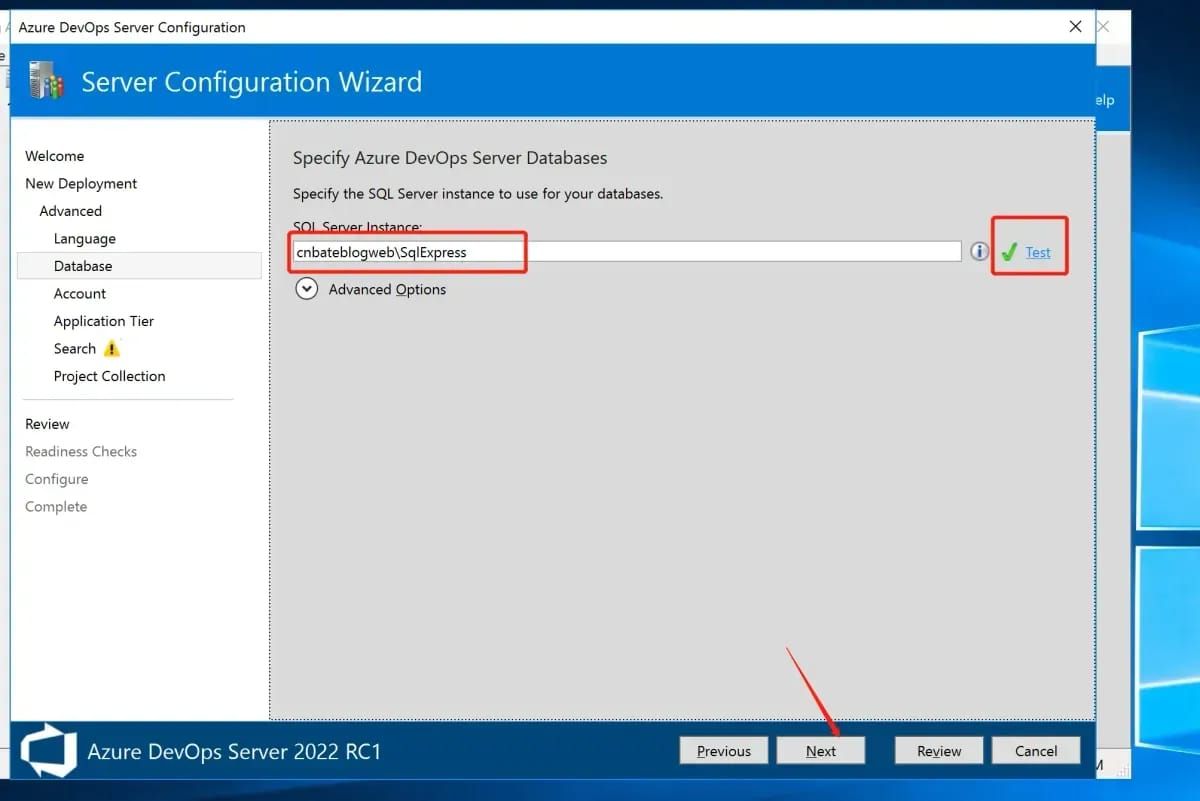
重点:需要提前将 Sql Server Express 安装好,如果想一键化安装可选择 "New Deployment - Basic"
默认将已经安装好的 Sql Server 的实例名显示出来(可用点击旁边的 Test 进行测试)
端口与搜索配置
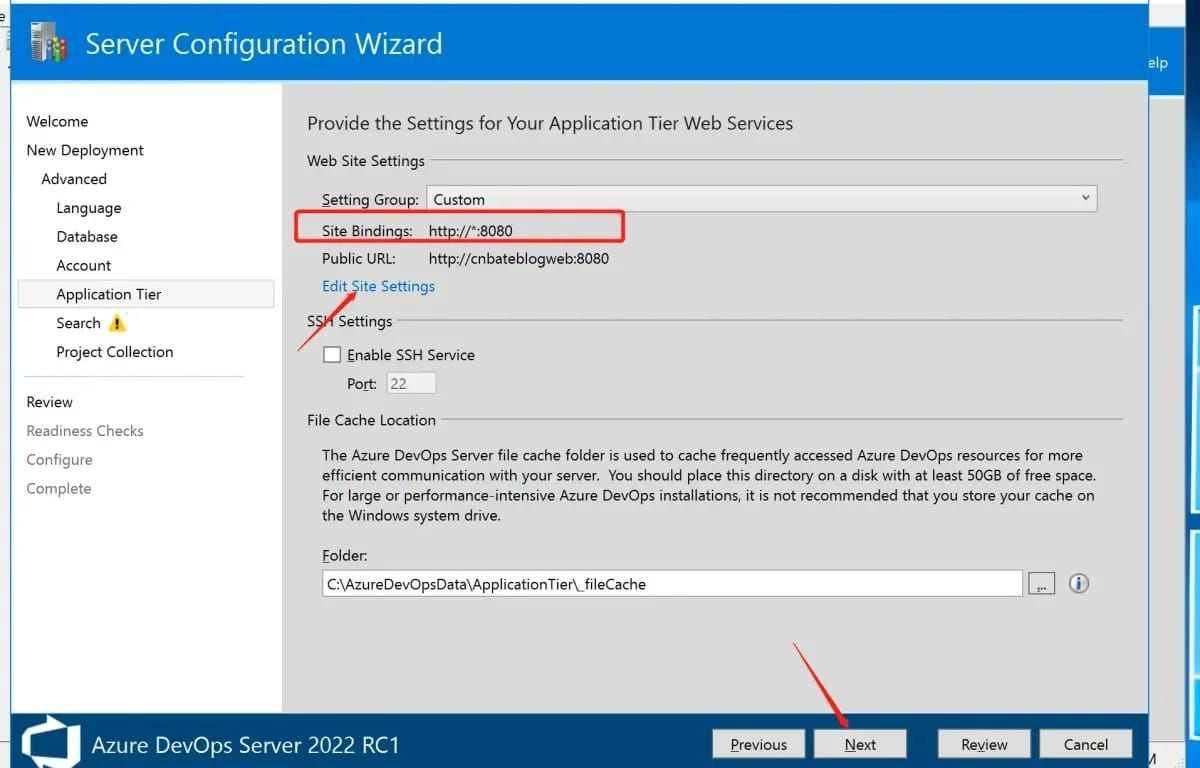
关于应用端口配置,我们点击 "Edit Site Setting" 修改默认的端口,将 80 改为 8080,并且取消 SSH Service 服务
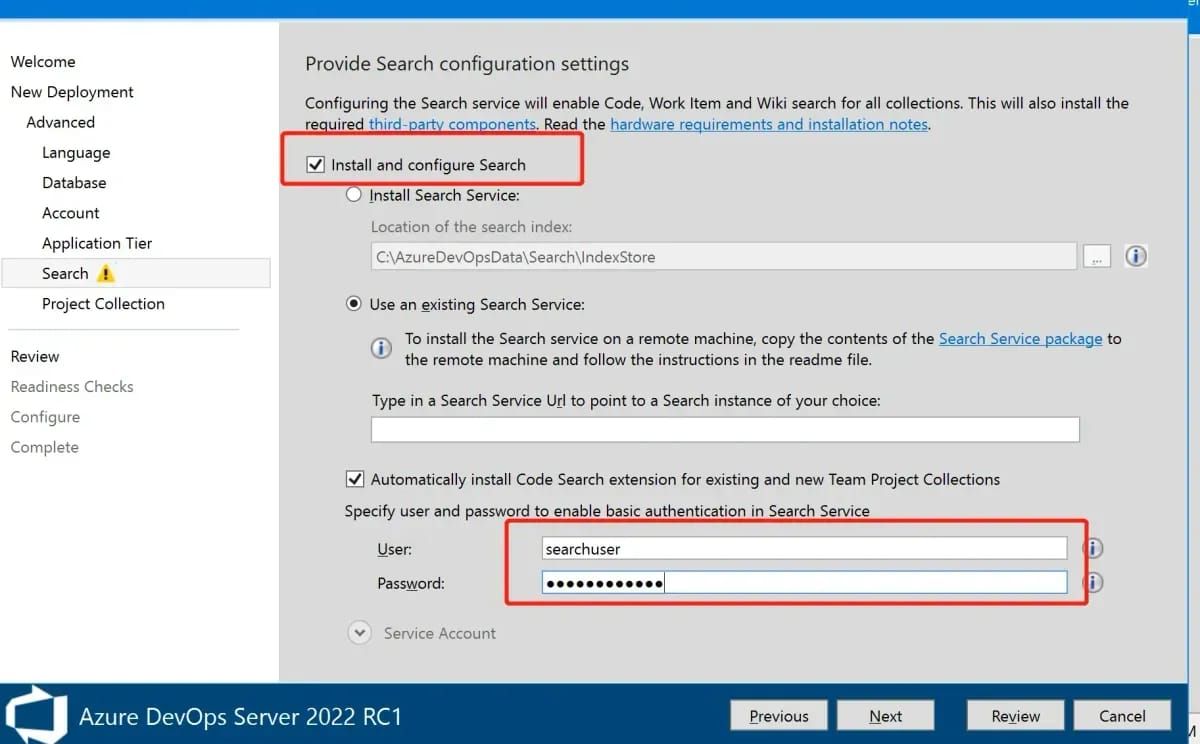
对于 Azure DevOps Server 的搜索配置,我们需要开启 ES 搜索
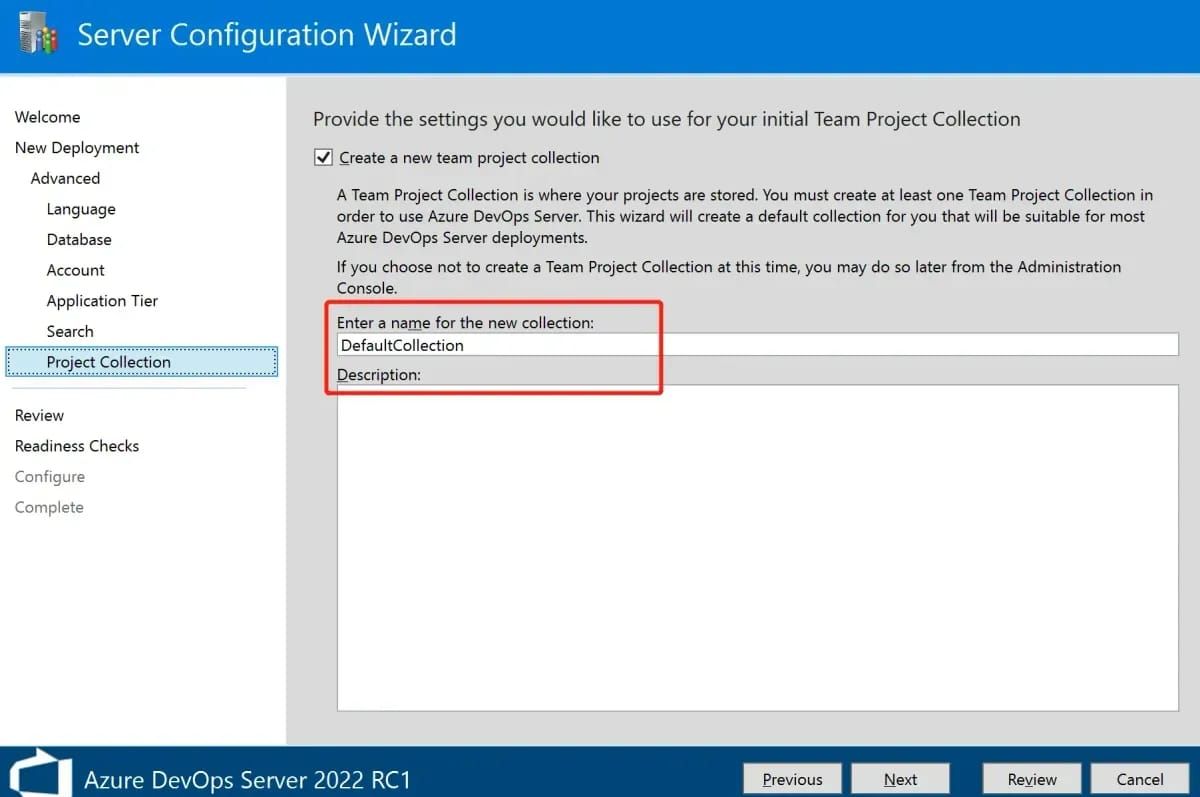
项目集合配置,默认会为我们撞见一个新的项目集合,集合名字默认为 "DefaultCollection"
环境检查与部署
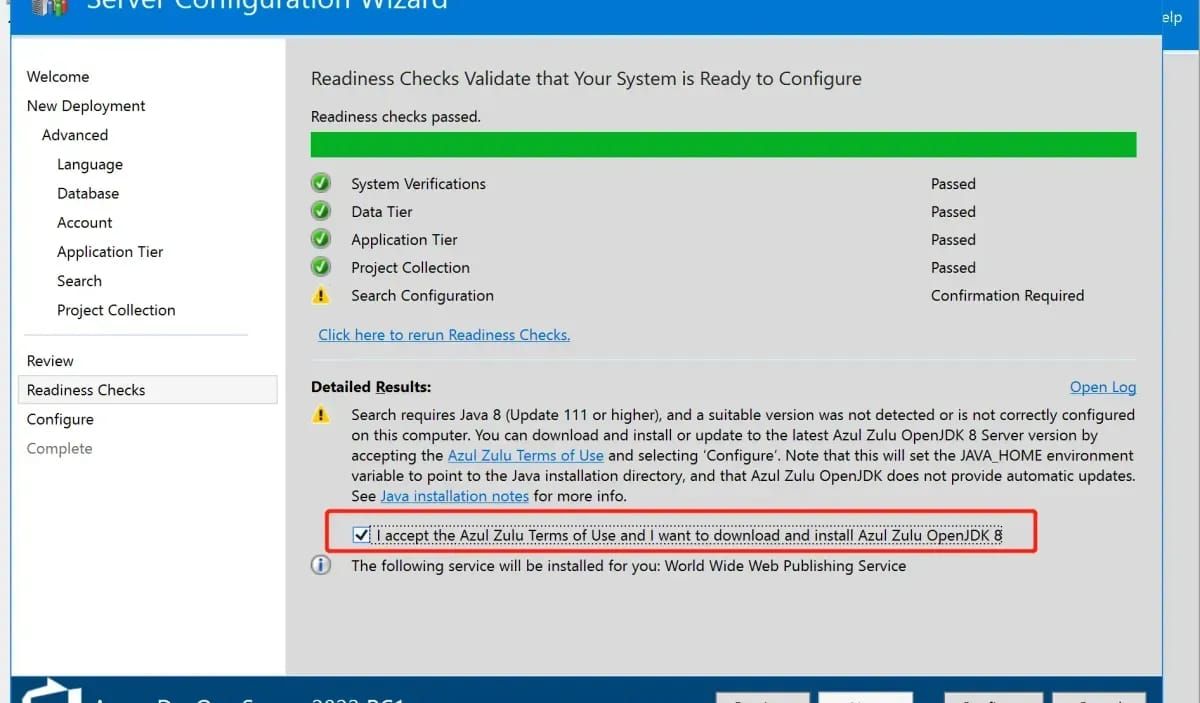
在部署前,Azure DevOps Server 的配置程序会帮我们检查环境,因为上一步,我们有勾选开启 ES 搜索功能,所以需要安装 Java 运行时。
重点:如果我们没有提前安装 Java 环境的话,只需要勾选 "install Azul Aulu OpenJDK 8" 即可
验证访问
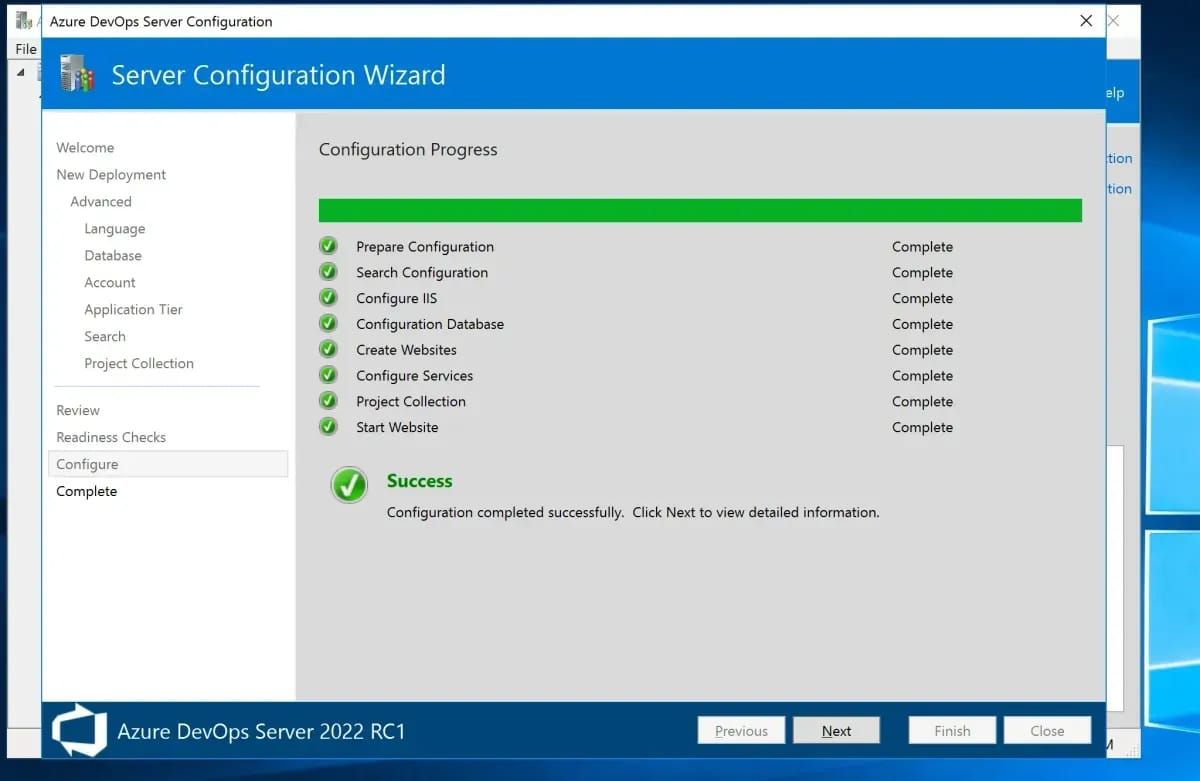
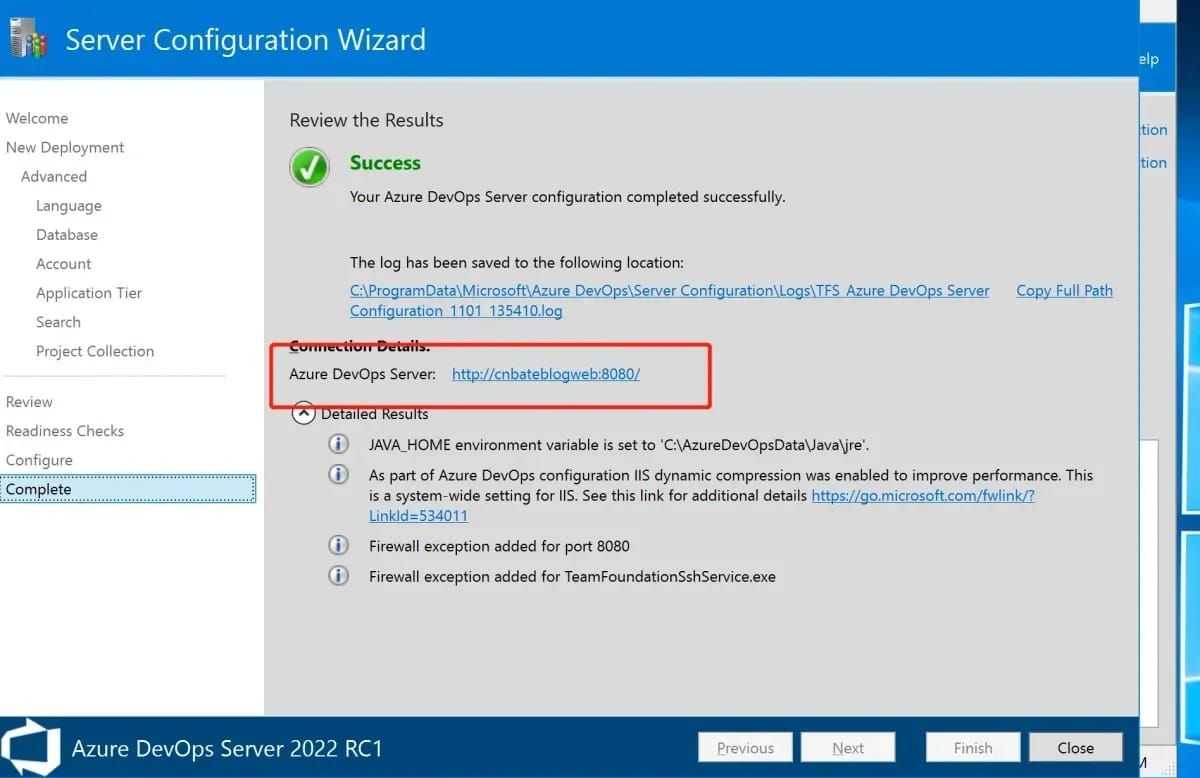
等待配置执行完成,我们可用尝试访问打开配置好的页面,我本地环境(http://cnbateblogweb:8080)
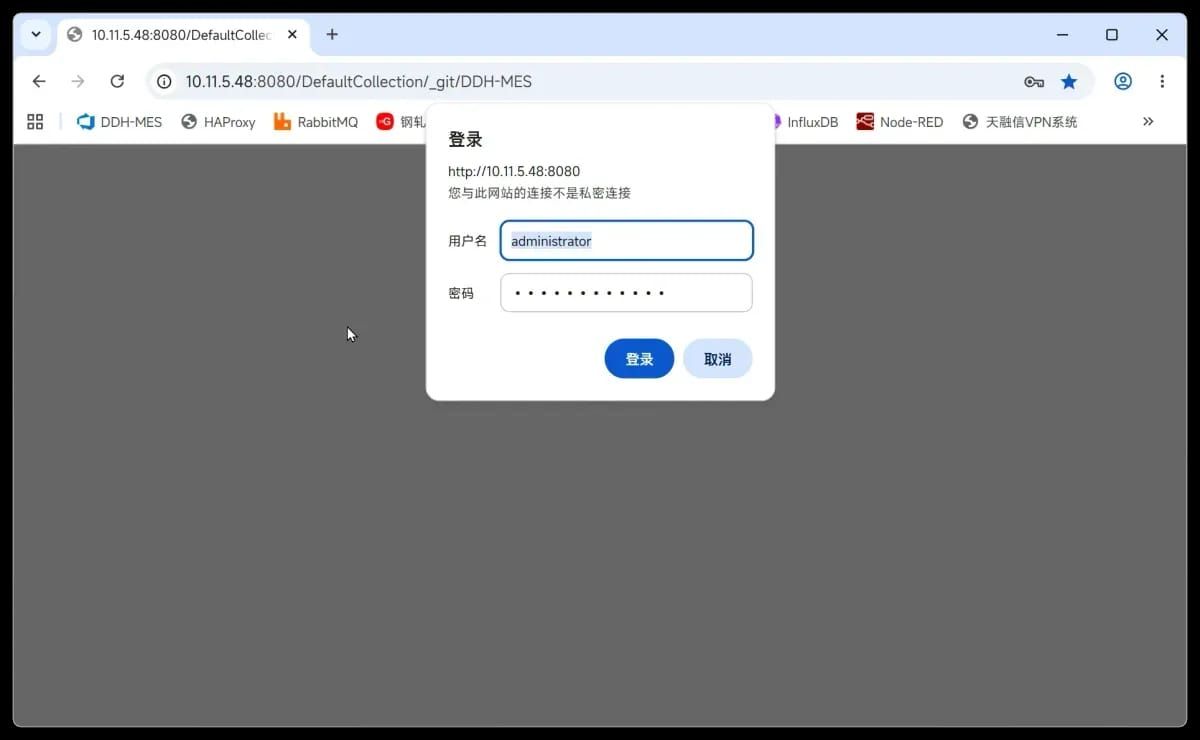
注意,访问链接的时候会提醒我们要进行 Windows 认证登录,当前 VM 的本地管理员账号也就是 Azure DevOps Server 的管理员账号
认证成功后,我们就看到这样的画面
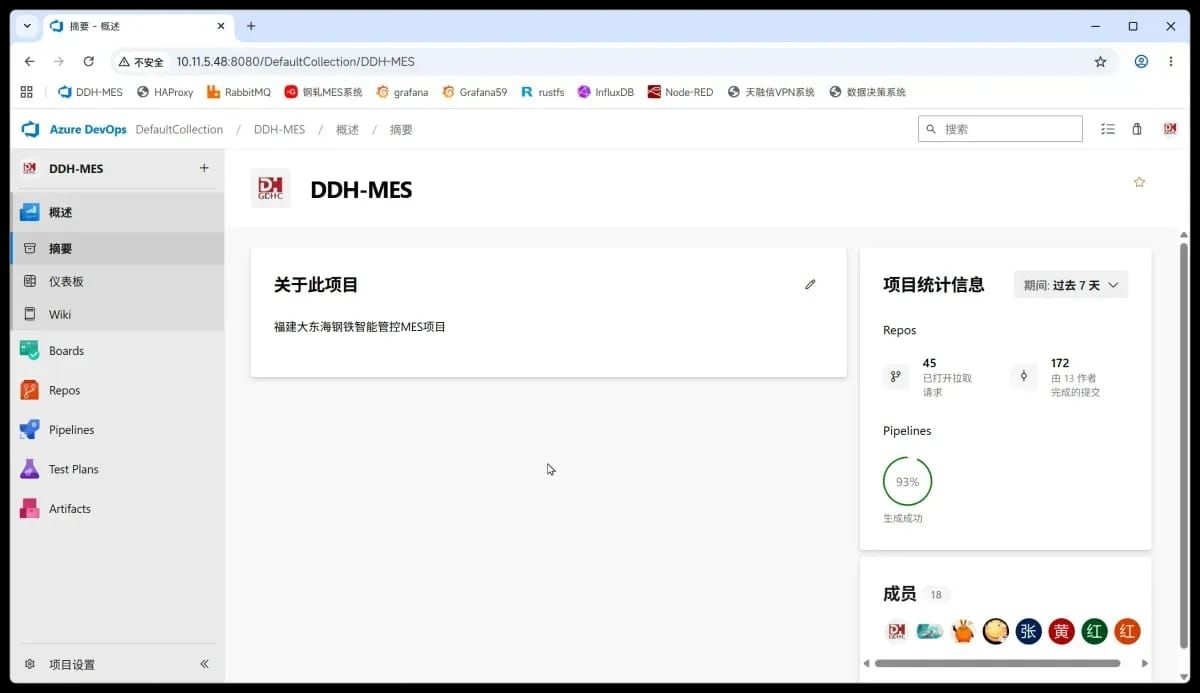
Bingo,成功,撒花🎉🎉🎉🎉🎉🎉
CI/CD 流水线配置
Azure DevOps Server 搭建完成后,需要配置持续集成/持续部署(CI/CD)流水线来实现自动化构建和部署。
流水线架构
┌─────────────────────────────────────────────────────────────┐
│                      Azure DevOps Pipeline                  │
├─────────────────────────────────────────────────────────────┤
│                                                             │
│  Stage 1: Build (编译构建)                                   │
│  ┌─────────────────────────────────────────────────────┐   │
│  │ 1. Checkout 代码(含子模块)                          │   │
│  │ 2. NuGet 还原                                       │   │
│  │ 3. Publish 后端服务 (Services)                       │   │
│  │ 4. Publish 前端 (WinForms)                           │   │
│  │ 5. 后处理(环境配置、版本号、清理)                    │   │
│  │ 6. 发布构建产物                                      │   │
│  └─────────────────────────────────────────────────────┘   │
│                          │                                  │
│                          ▼                                  │
│  Stage 2: Deploy (部署)                                     │
│  ┌─────────────────────────────────────────────────────┐   │
│  │ 1. 下载构建产物                                      │   │
│  │ 2. 停止服务 (NSSM)                                   │   │
│  │ 3. 传输文件 (boltgo/robocopy)                        │   │
│  │ 4. 启动服务 (NSSM)                                   │   │
│  └─────────────────────────────────────────────────────┘   │
│                                                             │
└─────────────────────────────────────────────────────────────┘
流水线文件结构
项目根目录/
├── scripts/
│   ├── pipelines-main-PRD.yaml              # 主流水线(PRD环境)
│   ├── pipelines-main-DEV.yaml              # 主流水线(DEV环境)
│   ├── pipelines-scripts-post-build-process.yml   # 编译后处理模板
│   ├── pipelines-scripts-deploy-service.yml       # 部署服务模板
│   ├── pipelines-scripts-boltgo-deploy.yml        # boltgo传输模板
│   ├── pipelines-scripts-winrm-exec.yml           # WinRM远程执行模板
│   ├── app-services-PRD.config.json               # 后端PRD配置
│   ├── app-services-DEV.config.json               # 后端DEV配置
│   ├── app-winforms-PRD.config.json               # 前端PRD配置
│   └── AutoUpdater-signed.exe                     # 自动更新程序
主流水线配置
pipelines-main-PRD.yaml
trigger: none  # 手动触发(不自动触发)

pool:
  name: default  # 使用 default 代理池

variables:
  - group: deploy_secrets_hgmes_PRD  # 变量组(存储服务器密码等敏感信息)

stages:
  # ==================== Stage 1: 编译构建 ====================
  - stage: Build
    displayName: 编译构建
    jobs:
      - job: BuildJob
        displayName: 编译 MES-PRD 项目
        steps:
          # 1. 拉取代码
          - checkout: self
            submodules: true
            clean: true

          # 2. 拉取依赖仓库
          - checkout: git://HgGzMes/Hmx_Admin
            path: Hmx.Admin

          # 3. NuGet还原
          - task: PowerShell@2
            displayName: "Nuget包还原"
            inputs:
              targetType: "inline"
              script: |
                dotnet restore "$(Build.SourcesDirectory)/HgGzMes/HgGzMes.slnx" \
                  --configfile "C:/AzureAgent/_work/nuget.config"

          # 4. 发布后端服务
          - task: DotNetCoreCLI@2
            displayName: "Publish Services"
            inputs:
              command: "publish"
              workingDirectory: $(Build.SourcesDirectory)/HgGzMes
              projects: ".../HgGzMes.Service.Startup.csproj"
              arguments: >
                --configuration Release --no-restore
                /p:PublishDir=".../output/publish/services"

          # 5. 发布前端
          - task: DotNetCoreCLI@2
            displayName: "Publish WinForms"
            inputs:
              command: "publish"
              workingDirectory: $(Build.SourcesDirectory)/HgGzMes
              projects: ".../HgGzMes.Winform.Startup.csproj"
              arguments: >
                --configuration Release --no-restore
                /p:PublishDir=".../output/publish/winforms"
                /p:UseAppHost=true

          # 6. 编译后处理
          - template: pipelines-scripts-post-build-process.yml
            parameters:
              cfgStartup: "HgGzMes.Winform.Startup"
              cfgEnv: "PRD"

          # 7. 发布产物
          - task: PublishBuildArtifacts@1
            displayName: "发布构建产物"
            inputs:
              PathtoPublish: '.../output/publish'
              ArtifactName: "drop"

  # ==================== Stage 2: 部署 ====================
  - stage: Deploy
    displayName: 部署测试服务器
    dependsOn: Build
    jobs:
      - job: DeployServer1Service
        displayName: "部署到远程服务器10"
        steps:
          - template: pipelines-scripts-deploy-service.yml
            parameters:
              serverIp: $(SERVER_A_IP)
              username: $(SERVER_A_USER)
              password: $(SERVER_A_PWD)
              serviceName: hggzmesapi

      - job: DeployServer2Service
        displayName: "部署到远程服务器11"
        steps:
          - template: pipelines-scripts-deploy-service.yml
            parameters:
              serverIp: $(SERVER_B_IP)
              username: $(SERVER_B_USER)
              password: $(SERVER_B_PWD)
              serviceName: hggzmesapi
模板文件详解
1. 编译后处理模板
文件:pipelines-scripts-post-build-process.yml
功能:
- 写入版本号文件
- 删除不需要的文件(pdb、xml、appsettings.json)
- 复制环境配置文件
- 复制自动更新程序
parameters:
  - name: cfgStartup       # 启动程序名
    type: string
    default: 'DDH.TQMES.Winform.Startup'
  - name: cfgEnv           # 环境:PRD 或 DEV
    type: string
    default: 'PRD'

steps:
  - task: PowerShell@2
    displayName: '处理编译后文件'
    inputs:
      targetType: 'inline'
      script: |
        $cfgStartup = "${{ parameters.cfgStartup }}"
        $cfgEnv     = "${{ parameters.cfgEnv }}"
        $dropPath   = "$(Build.SourcesDirectory)/HgGzMes\output\publish"
        $scriptPath = "$(Build.SourcesDirectory)/HgGzMes\scripts"

        $servicesPath = Join-Path $dropPath "services"
        $winformsPath = Join-Path $dropPath "winforms"
        $buildVersion = "Build_$(Get-Date -Format 'yyyyMMdd_HHmmss')"

        # 写入版本号
        $buildVersion > (Join-Path $servicesPath "version")
        $buildVersion > (Join-Path $winformsPath "version")

        # 删除调试文件
        Get-ChildItem -Path $dropPath -Recurse `
          -Include *.pdb, *.xml, appsettings.json | Remove-Item -Force

        # 复制环境配置
        Copy-Item "$scriptPath\app-services-$cfgEnv.config.json" `
          "$servicesPath\appsettings.json" -Force
        Copy-Item "$scriptPath\app-winforms-$cfgEnv.config.json" `
          "$winformsPath\appsettings.json" -Force

        # 复制自动更新
        Copy-Item "$scriptPath\AutoUpdater-signed.exe" `
          "$winformsPath\AutoUpdater.exe" -Force
        Copy-Item "$scriptPath\AutoUpdater-$cfgEnv.exe.config" `
          "$winformsPath\AutoUpdater.exe.config" -Force
2. 部署服务模板
文件:pipelines-scripts-deploy-service.yml
功能:
- 下载构建产物
- 停止Windows服务(NSSM)
- 传输文件到服务器
- 启动Windows服务
parameters:
  - name: serverIp
    type: string
  - name: username
    type: string
  - name: password
    type: string
  - name: serviceName
    type: string

steps:
  # 下载产物
  - task: DownloadBuildArtifacts@1
    displayName: '下载构建物到代理点'
    inputs:
      buildType: 'current'
      downloadType: 'single'
      artifactName: 'drop'
      downloadPath: '$(System.DefaultWorkingDirectory)/output'

  # 停止服务
  - template: pipelines-scripts-winrm-exec.yml
    parameters:
      serverInfo: "${{ parameters.serverIp }} ${{ parameters.username }} ${{ parameters.password }}"
      remoteCommand: |
        & `"nssm.exe`" stop ${{ parameters.serviceName }} > `$null 2>&1

  # 传输后端服务(445可用时用robocopy,否则用boltgo)
  - template: pipelines-scripts-robocopy-deploy.yml
    parameters:
      sourcePath: '$(System.DefaultWorkingDirectory)/output/drop/services'
      targetPath: '$(MES_ROOT_PATH)/api'
      serverIp: '${{ parameters.serverIp }}'
      username: '${{ parameters.username }}'
      password: '${{ parameters.password }}'
      cleanTarget: true

  # 传输前端更新包
  - template: pipelines-scripts-robocopy-deploy.yml
    parameters:
      sourcePath: '$(System.DefaultWorkingDirectory)/output/drop/winforms'
      targetPath: '$(MES_ROOT_PATH)/api/update'
      serverIp: '${{ parameters.serverIp }}'
      username: '${{ parameters.username }}'
      password: '${{ parameters.password }}'
      cleanTarget: true

  # 启动服务
  - template: pipelines-scripts-winrm-exec.yml
    parameters:
      serverInfo: "${{ parameters.serverIp }} ${{ parameters.username }} ${{ parameters.password }}"
      remoteCommand: |
        & `"nssm.exe`" start ${{ parameters.serviceName }} > `$null 2>&1
3. 文件传输模板选择
项目提供两种文件传输模板,根据网络环境选择:
| 模板 | 协议 | 端口 | 适用场景 |
|---|---|---|---|
| robocopy-deploy | SMB/CIFS | 445 | 445端口可用(优先使用) |
| boltgo-deploy | QUIC | UDP 7879 | 445端口被封锁 |
⚠️ 重要:445端口可用时,优先使用robocopy模板,性能更稳定、配置更简单。
3.1 robocopy传输模板(推荐)
文件:pipelines-scripts-robocopy-deploy.yml
说明:使用Windows内置的robocopy工具通过SMB协议传输文件,稳定可靠。
优势:
- Windows内置,无需额外安装
- 支持多线程(/MT:16)
- 支持断点续传
- 自动重试(/R:3 /W:5)
- 详细的日志输出
parameters:
  - name: sourcePath          # 本地源路径
    type: string
  - name: targetPath          # 远程目标路径(如 D:\mes-apps\api)
    type: string
  - name: serverIp            # 目标服务器 IP
    type: string
  - name: username            # 管理员用户名
    type: string
  - name: password            # 管理员密码
    type: string
  - name: cleanTarget         # 是否镜像清理(默认true)
    type: boolean
    default: true

steps:
  - task: PowerShell@2
    displayName: ${{ parameters.displayName }}
    inputs:
      targetType: inline
      script: |
        # 自动把 D:\path 转成 \\IP\D$\path
        if ($dest -notmatch '^\\\\') {
            $drive = $dest.Split(':\')[0] + '$'
            $path  = $dest.Substring(3).Replace('\','\')
            $dest  = "\\$ip\$drive\$path"
        }

        # 建立SMB连接
        net use "\\$ip" $pass /user:$user >$null 2>&1

        # 执行robocopy
        if ($clean -eq 'true') {
            robocopy "$src" "$dest" /MIR /MT:16 /R:3 /W:5 /NP /NFL
        } else {
            robocopy "$src" "$dest" /E /MT:16 /R:3 /W:5 /NP /NFL
}robocopy参数说明:
| 参数 | 说明 |
|---|---|
/MIR | 镜像模式(同步删除目标多余文件) |
/E | 复制子目录(包括空目录) |
/MT:16 | 16线程并行复制 |
/R:3 | 失败重试3次 |
/W:5 | 重试间隔5秒 |
/NP | 不显示进度百分比 |
/NFL | 不记录文件名日志 |
3.2 boltgo传输模板
文件:pipelines-scripts-boltgo-deploy.yml
说明:使用boltgo QUIC协议传输文件,适用于SMB端口被封锁的环境。
📦 boltgo 是一个基于QUIC协议的高速文件传输工具,专为内网环境设计。
GitHub仓库:https://github.com/zhaxg/boltgo
特点:
- 基于QUIC协议,传输速度快
- 不需要账号密码,服务端
boltgo recv保持常驻- 适用于SMB/445端口被封锁的环境
- 支持断点续传
前置条件:
- 代理服务器和目标服务器均已将
boltgo.exe加入 PATH - 目标服务器需开放 UDP 7879 端口
- 目标服务器
boltgo recv常驻运行
parameters:
  - name: sourcePath          # 本地源路径
    type: string
  - name: targetPath          # 远程目标路径
    type: string
  - name: serverIp            # 目标服务器 IP
    type: string
  - name: username            # 管理员用户名
    type: string
  - name: password            # 管理员密码
    type: string
  - name: cleanTarget         # 是否清理目标目录(默认true)
    type: boolean
    default: true

steps:
  - task: PowerShell@2
    displayName: ${{ parameters.displayName }}
    inputs:
      targetType: inline
      script: |
        # 1. 探测服务端 dest 目录
        $saveToBase = (boltgo probe "${ip}:7879").Trim()

        # 2. boltgo 传输到临时子目录
        $subDir = "deploy_$(Get-Random -SetSeed (Get-Date).Millisecond)"
        boltgo send "$src" "${ip}:7879" "$subDir" --debug

        # 3. WinRM 远程移动文件到最终目标
        Invoke-Command -Session $session -ScriptBlock {
          param($saveToBase, $subDir, $dest, $clean)
          $src = Join-Path $saveToBase $subDir
          $mode = if ($clean -eq "true") { "/MIR" } else { "/E" }
          robocopy $src $dest $mode /MT:16 /R:3 /W:5
        }
4. WinRM远程执行模板
文件:pipelines-scripts-winrm-exec.yml
功能:通过WinRM远程执行命令(如启动/停止服务)
前置条件:
# 客户端(Azure DevOps代理)配置
winrm set winrm/config/client/auth '@{Basic="true"}'
winrm set winrm/config/client '@{AllowUnencrypted="true"}'
Set-Item WSMan:\localhost\Client\TrustedHosts -Value "*"

# 目标服务器配置
winrm set winrm/config/service/auth '@{Basic="true"}'
winrm set winrm/config/service '@{AllowUnencrypted="true"}'parameters:
- name: serverInfo
type: string # 格式: "serverIp username password"
- name: remoteCommand
type: string
steps:
- task: PowerShell@2
displayName: "远程执行命令"
inputs:
targetType: 'inline'
script: |
$parts = "${{ parameters.serverInfo }}" -split '\s+'
$serverIp = $parts[0]
$username = $parts[1]
$password = $parts[2]
$Pass = ConvertTo-SecureString $password -AsPlainText -Force
$Creds = New-Object System.Management.Automation.PSCredential($username, $Pass)
Invoke-Command -ComputerName $serverIp -Port 5985 -Credential $Creds `
-Authentication Basic -UseSSL:$false -ScriptBlock {
param($cmd)
Invoke-Expression $cmd
} -ArgumentList "${{ parameters.remoteCommand }}"配置步骤
Step 1: 创建项目和仓库
- 在Azure DevOps中创建项目
- 导入Git仓库
- 配置子模块访问权限
Step 2: 配置代理池
- 进入 Project Settings → Agent pools
- 创建或使用
default代理池 - 确保代理服务器已安装:
- .NET SDK 10.0
- NuGet配置文件
- boltgo.exe(如使用boltgo传输)
- nssm.exe(Windows服务管理)
Step 3: 创建变量组
- 进入 Pipelines → Library
- 创建变量组
deploy_secrets_hgmes_PRD - 添加以下变量:
| 变量名 | 说明 | 示例 |
|---|---|---|
SERVER_A_IP | 服务器A的IP | 10.11.5.49 |
SERVER_A_USER | 服务器A的用户名 | admin |
SERVER_A_PWD | 服务器A的密码 | ***(标记为Secret) |
SERVER_B_IP | 服务器B的IP | 10.11.5.50 |
SERVER_B_USER | 服务器B的用户名 | admin |
SERVER_B_PWD | 服务器B的密码 | ***(标记为Secret) |
MES_ROOT_PATH | MES安装根路径 | D:\mes-apps |
Step 4: 配置环境配置文件
在 scripts 目录下创建环境配置文件:
app-services-PRD.config.json:
{
  "AppSettings": {
    "loglevel": "info"
  },
  "ConnectionStrings": {
    "redis": "10.11.5.49:6379,password=xxx",
    "rabbitmq": "amqp://user:pass@10.11.5.57:5672/prd",
    "masterdb": "Oracle.Managed://User Id=xxx;Password=xxx;Data Source=xxx"
  },
  "Urls": "http://0.0.0.0:5225"
}app-winforms-PRD.config.json:
{
  "AppSettings": {
    "loglevel": "info"
  },
  "ConnectionStrings": {
    "SignalR": "http://10.11.5.49:5225"
  }
}
Step 5: 创建流水线
- 进入 Pipelines → New pipeline
- 选择 Existing Azure Pipelines YAML file
- 选择
scripts/pipelines-main-PRD.yaml - 保存并运行
服务器目录结构
部署完成后,服务器上的目录结构:
D:\mes-apps\
├── api\                          # 后端服务
│   ├── Hmx.Service.Startup.exe
│   ├── appsettings.json          # 环境配置(编译后替换)
│   ├── version                   # 版本号文件
│   └── update\                   # 前端更新包
│       ├── Hmx.Winforms.Startup.exe
│       ├── AutoUpdater.exe
│       └── ...
├── apks\                         # 移动端APK
├── logs\                         # 日志目录
├── nginx\                        # Nginx服务
├── upload\                       # 文件上传目录
└── web\                          # 前端静态文件
常见问题
1. NuGet还原失败
原因:nuget.config路径错误或网络问题
解决:
- 确认
C:/AzureAgent/_work/nuget.config存在 - 检查NuGet源是否可达
2. boltgo传输失败
原因:UDP端口未开放或boltgo服务未启动
解决:
- 检查目标服务器7879端口是否开放
- 确认目标服务器
boltgo recv正在运行 - 测试:
boltgo probe 10.11.5.49:7879
3. WinRM连接失败
原因:WinRM配置不正确
解决:
# 在代理服务器上执行
winrm set winrm/config/client/auth '@{Basic="true"}'
winrm set winrm/config/client '@{AllowUnencrypted="true"}'
Set-Item WSMan:\localhost\Client\TrustedHosts -Value "*"

# 在目标服务器上执行
winrm set winrm/config/service/auth '@{Basic="true"}'
winrm set winrm/config/service '@{AllowUnencrypted="true"}'
4. 服务启动失败
原因:NSSM未安装或服务名错误
解决:
- 确认nssm.exe在目标服务器PATH中
- 确认变量组中的
serviceName与NSSM注册的服务名一致