后端service开发
表与实体
对于大型应用系统开发来说,我们依然坚持数据库优先,而不是代码优先(code first);
你的业务开发,从数据库表开始,比如,你有一个部门维护表:
| 名称 | 类型 | 长度 | 小数点 | 是否为空 | 主键 | 备注 |
|---|---|---|---|---|---|---|
| id | varchar | 32 | 0 | True | 1 | |
| c_dept_code | varchar | 100 | 0 | True | 部门编码 | |
| c_dept_name | varchar | 100 | 0 | False | 部门名称 | |
| n_status | numeric | 1 | 0 | False | 状态1启用,0停用 | |
| c_creator | varchar | 100 | 0 | False | 创建人 | |
| d_create_time | timestamp | 6 | 0 | False | 创建时间 | |
| c_last_modifier | varchar | 100 | 0 | False | 最后更新人 | |
| d_last_modify_time | timestamp | 6 | 0 | False | 最后更新时间 |
虽然我们支持不同的主键形式,但是我们约定主键字段为ID,类型为32位字符串,否则你会遇到各种麻烦。
四个审计字段是固定的,可以有也可以没有,框架会自动检测并赋值。
c_creator、d_create_time、c_last_modifier、d_last_modify_time。
如果你希望有个乐观锁控制,字段固定为n_row_version,整形int。
下一步,准备实体,你可以手写,也可以自动生成:Hello.Service\Entities\Basic\TbbDept.cs
/// <summary>
/// 部门编码
/// </summary>
public partial class TbbDept : HmxEntity , IHmxFullAuditedEntity
{
    /// <summary>
    /// id
    /// </summary>
    [LDisplay("id")]
    public override string Id { get; set; }

    /// <summary>
    /// 部门编码
    /// </summary>
    [LDisplay("部门编码")]
    public virtual string CDeptCode { get; set; }

    /// <summary>
    /// 部门名称
    /// </summary>
    [LDisplay("部门名称")]
    public virtual string CDeptName { get; set; }

    /// <summary>
    /// 状态1启用,0停用
    /// </summary>
    [LDisplay("状态1启用,0停用")]
    public virtual decimal? NStatus { get; set; }

    /// <summary>
    /// 创建人
    /// </summary>
    [LDisplay("创建人")]
    public virtual string Creator { get; set; }

    /// <summary>
    /// 创建时间
    /// </summary>
    [LDisplay("创建时间")]
    public virtual DateTime? CreateTime { get; set; }

    /// <summary>
    /// 最后更新人
    /// </summary>
    [LDisplay("最后更新人")]
    public virtual string LastModifier { get; set; }

    /// <summary>
    /// 最后更新时间
    /// </summary>
    [LDisplay("最后更新时间")]
    public virtual DateTime? LastModifyTime { get; set; }

}
基于我们的ORM工具,你还需要准备映射文件:Hello.Service.Impl\Mappings\basic\TbbDeptMapping.cs
/// <summary>
/// 部门表映射文件
/// </summary>
public partial class TbbDeptMapping : ILinq2dbFluentEnityMapping
{
    /// <summary>
    /// 配置
    /// </summary>
    /// <param name="model"></param>
    public void Configure(FluentMappingBuilder model)
    {
        model.Entity<TbbDept>()
            .HasTableName("TBB_DEPT")
            .HasPrimaryKey(x => x.Id)
            .Property(x => x.Selected).IsNotColumn()
            .Property(x => x.Id).HasColumnName("ID")
            .Property(x => x.CDeptCode).HasColumnName("C_DEPT_CODE")
            .Property(x => x.CDeptName).HasColumnName("C_DEPT_NAME")
            .Property(x => x.NStatus).HasColumnName("N_STATUS")
            .Property(x => x.Creator).HasColumnName("c_creator")
            .Property(x => x.CreateTime).HasColumnName("d_create_time")
            .Property(x => x.LastModifier).HasColumnName("c_last_modifier")
            .Property(x => x.LastModifyTime).HasColumnName("d_last_modify_time");
    }
}生成工具,web地址为:http://localhost:5225/admin/code(启动后端服务后访问)
当然winform也是有的;
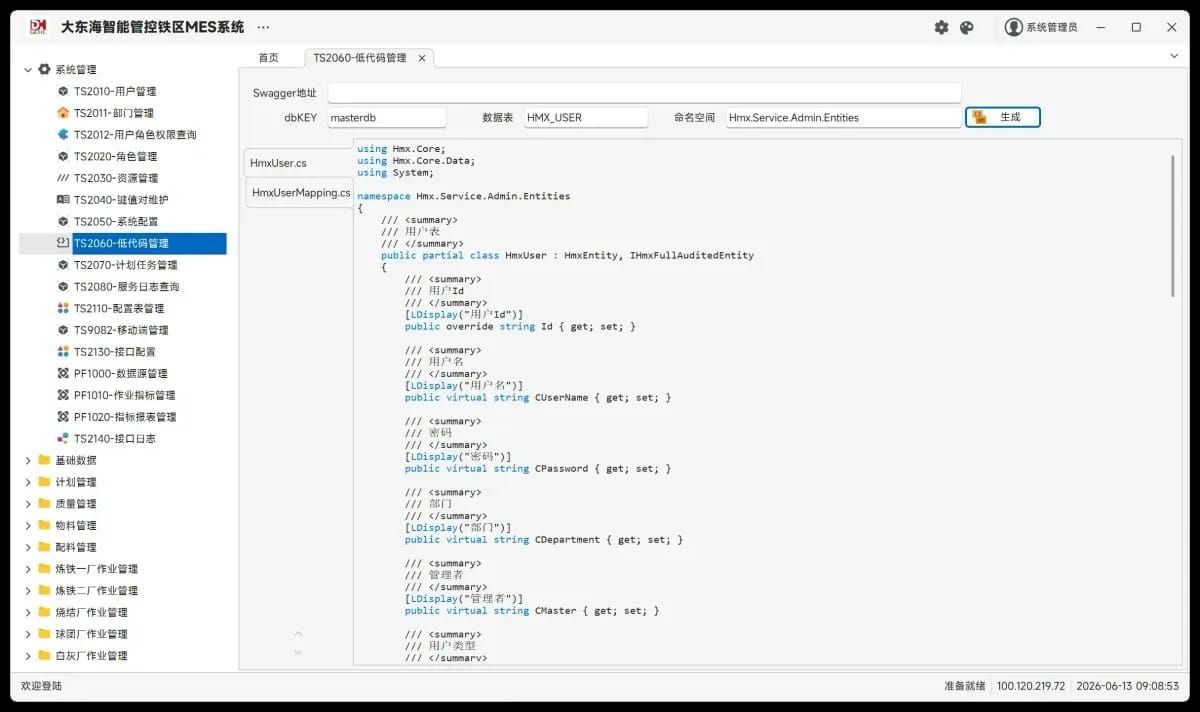
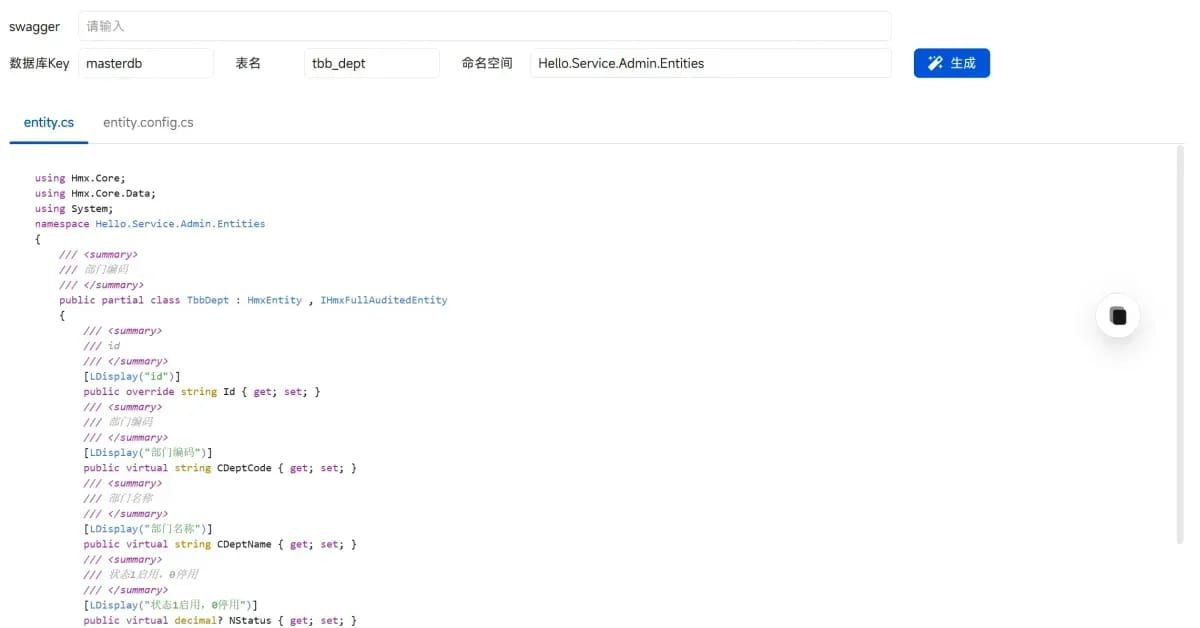
新增服务
⚠️ 重要警告:服务类和接口必须定义在正确的命名空间下,否则框架无法识别,会导致动态WebAPI生成失败,程序运行时报错!
记住一个服务需要契约层和实现层,也就是分别存放于Hello.Service和Hello.Service.Impl两个项目里面。
命名空间规范:
- 契约层接口:
{项目名}.Services.{模块名} - 实现层类:
{项目名}.Services.{模块名}(与接口保持一致)
正确的命名空间示例:
// ✅ 正确:有明确的命名空间
namespace Hmx.Service.Admin.Services
{
    public interface IDeptAppService : IHmxAppService { }
    public class DeptAppService : HmxAppServiceBase<DeptAppService>, IDeptAppService { }
}

// ❌ 错误:缺少命名空间,会导致框架无法识别
public interface IDeptAppService : IHmxAppService { }
public class DeptAppService : HmxAppServiceBase<DeptAppService>, IDeptAppService { }
比如你可以定义一个部门管理的服务接口,存放在Hello.Service/Services/Basic/IDeptAppService.cs文件:
/// <summary>
/// 部门管理
/// </summary>
public interface IDeptAppService : IHmxAppService
{
    /// <summary>
    /// 获取部门列表
    /// </summary>
    /// <param name="input"></param>
    /// <returns></returns>
    Task<List<TbbDept>> GetDeptList(TbbDept input);

    /// <summary>
    /// 添加客户列表
    /// </summary>
    /// <returns></returns>
    Task AddDeptList(TbbDept tbbDept);

    /// <summary>
    /// 更新客户列表
    /// </summary>
    /// <returns></returns>
    Task UpdateDeptList(TbbDept tbbDept);
}
特别注意:命名约定【IXXXXXAppService】,且必须继承IhmxAppService是固定写法;
对应的,你必须有该接口的实现,存放于Hello.Service.Impl/Services/Basic/DeptAppService.cs:
/// <summary>
/// 部门服务
/// </summary>
public class DeptAppService : HmxAppServiceBase<DeptAppService>, IDeptAppService
{
    /// <summary>
    /// 添加部门列表
    /// </summary>
    public async Task AddDeptList(TbbDept tbbDept)
    {
        if (string.IsNullOrEmpty(tbbDept?.CDeptCode))
        {
            throw new UserFriendlyException("部门编码为空,请检查输入信息。");
        }

        tbbDept.Id = YitIdHelper.NextStrId();
        tbbDept.NStatus ??= 1;

        var db = GetDbContext();

        // 检查客户编码是否已存在
        var existingCustomer = await db.GetTable<TbbDept>()
            .Where(x => x.CDeptCode == tbbDept.CDeptCode)
            .FirstOrDefaultAsync();

        if (existingCustomer != null)
        {
            throw new UserFriendlyException("部门编码已存在,请检查输入信息。");
        }

        tbbDept.Id = YitIdHelper.NextStrId();
        await db.InsertAsync(tbbDept);
    }

    /// <summary>
    /// 修改部门列表
    /// </summary>
    public async Task UpdateDeptList(TbbDept tbbDept)
    {
        var db = GetDbContext();
        await db.UpdateAsync(tbbDept);
    }

    /// <summary>
    /// 获取部门列表
    /// </summary>
    public async Task<List<TbbDept>> GetDeptList(TbbDept input)
    {
        var db = GetDbContext();
        var query = await db.GetTable<TbbDept>()
            .WhereIf(!string.IsNullOrEmpty(input?.CDeptName), x => x.CDeptName.Contains(input.CDeptName))
            .WhereIf(!string.IsNullOrEmpty(input?.CDeptCode), x => x.CDeptCode.Contains(input.CDeptCode))
            .Where(x => x.NStatus == 1)
            .OrderBy(x => x.CDeptCode)
            .ToListAsync();
        return query;
    }
}
特别注意:命名约定【XXXXXAppService】,且必须继承HmxAppServiceBase<DeptAppService>, IDeptAppService是固定写法;
当然我们不建议使用实体入TbbDept直接在服务的输入和输出操作。更好的,我们建议您使用DTO对象:
比如:\Hello.Service\Dtos\basic\InputZbsDto.cs
/// <summary>
/// 质保书查询输入参数
/// </summary>
public class InputZbsDto
{
    /// <summary>
    /// 证书号
    /// </summary>
    public virtual string CZsh { get; set; }

    /// <summary>
    /// 钢种
    /// </summary>
    public virtual string CSgCode { get; set; }

    /// <summary>
    /// 原客户名称
    /// </summary>
    public virtual string CCustName1 { get; set; }

    /// <summary>
    /// 开始时间
    /// </summary>
    public virtual string DBegin { get; set; }

    /// <summary>
    /// 截止时间
    /// </summary>
    public virtual string DEnd { get; set; }
}写完了,你就可以运行程序了,然后访问http://192.168.132.68:5225/swagger/index.html,你会看到:


到这里,你的后端服务就成功了!
常见组件使用
缓存组件
在所有的服务基类HmxAppServiceBase<T>里面都有两个属性:(区别是本地缓存还是分布式缓存)
protected virtual IHmxDistributedCache DistributedCache
{
    get { return EngineContext.Current.Resolve<IHmxDistributedCache>(); }
}

protected virtual IHmxCache MemoryCache
{
    get { return EngineContext.Current.Resolve<IHmxCache>(); }
}
序列化组件
二进制序列化 :var formatter = EngineContext.Current.Resolve<IHmxBinaryFormatter>();
- object Deserialize(byte[] bytes, Type type);
- byte[] Serialize(object value);
Json序列化直接使用微软的System.Text.Json 或者 newtonsoft.json ,请直接参考官方文档。
日志组件
在所有的服务基类HmxAppServiceBase<T>里面都有两个属性:(区别是本地缓存还是分布式缓存)
protected virtual ILogger<T> Logger
{
    get
    {
        return EngineContext.Current.Resolve<ILogger<T>>();
    }
}
当然你也可以直接使用 static readonly ILogger _log = LogManager.GetDefaultLogger();来获取日志对象;
事务控制
系统内默认一个请求就自动开启一个事务,实际上您完全不必要关心事务的控制。
如果你想了解细节,以及手动控制,您可以参考下面的代码片段:
using (var scop = Hmx.Http.Core.Data.Uow.UnitOfWorkManager.Begin(UowScopeOption.RequiresNew))//开启一个单独的事务
{
    var tsUser = new TsUser();

    tsUser.Id = Hmx.Service.Widgets.Utilities.SequenceUtility.GenerateID();
    tsUser.CUserName = "lizx";
    GetDbContext().InsertAsync(tsUser);
    GetDbContext().DeleteAsync(x => x.CUserName == "lizx");

    using (var uow2 = Hmx.Http.Core.Data.Uow.UnitOfWorkManager.Begin(UowScopeOption.Suppress))
    {
        //该部分代码脱离父级事务,表示不在事务范围内,该部分代码没有事务控制
    }

    scop.Complete();//一定要执行这句话,否则事务无法提交
}
数据库连接
/// <summary>
/// 获取数据库时间
/// </summary>
public async Task<DateTime> GetDataBaseTime()
{
    var db = GetDbContext() as HmxLinq2dbDataRepository;
    var dtime = db.GetDataConnection().Select(() => Sql.CurrentTimestamp);//这里具备原生ADO.NET的访问
    return await Task.FromResult(dtime);
}
用户上下文
你可以从 EngineContext.Current.User 获取当前的登录用户信息:
public interface IHmxSession
{
    string UserId { get; }
    string UserName { get; }
    string Token { get; }
    bool IsAuthenticated { get; }
    UserType UserType { get; }
}
序列号生成
请使用Hmx.Core.Utils.YitIdHelper,他有两个调用方法:
public static long NextId()
public static string NextStrId()
参考用法:
var newPermissions = input.RescIds.Select(x => new HmxRolePermission
{
    Id = YitIdHelper.NextStrId(),
    CNsCode = input.GroupId,
    CRoleId = input.RoleId,
    CRescId = x,
}).ToList();
配置文件
后端服务使用 appsettings.json 进行配置,支持多环境配置(如 appsettings.Development.json)。
配置文件位置
| 项目 | 配置文件路径 |
|---|---|
| 后端WebAPI服务 | admin/Hmx.Service.Startup/appsettings.json |
完整配置结构
{
  "AppSettings": {
    "loglevel": "debug",
    "logBasedir": "",
    "swaggerEnable": "true",
    "backgroudJob": "Enable",
    "uploadPath": "D:\\mes-apps\\upload",
    "ipAccessFilter": "true",
    "nacos_namespace": "DEFAULT",
    "nacos_config_dataid": "MES"
  },
  "ConnectionStrings": {
    "redis": "10.11.5.49:6379,password=redis123!",
    "rabbitmq": "amqp://user:password@10.11.5.57:5672/dev",
    "influxdb": "http://user:token@10.11.5.59:8086",
    "masterdb": "Oracle.Managed://User Id=gzmes;Password=gzmes,-123;Data Source=10.11.5.47/RMESCDB;"
  },
  "OpenAI": {
    "ModelId": "oc/deepseek-v4-flash-free",
    "Endpoint": "https://api.example.com/v1",
    "ApiKey": "sk-xxxxxxxxxxxx"
  },
  "Urls": "http://0.0.0.0:5225",
  "AllowedHosts": "*"
}
配置项详解
1. AppSettings - 应用设置
| 配置项 | 类型 | 默认值 | 说明 |
|---|---|---|---|
loglevel | string | debug | 日志级别:Trace, Debug, Info, Warn, Error, Fatal |
logBasedir | string | ${basedir}/logs | 日志文件存放目录,支持绝对路径 |
swaggerEnable | string | true | 是否启用Swagger API文档,设为 false 可关闭 |
backgroudJob | string | - | 后台任务调度,设为 Enable 启用Quartz调度器 |
uploadPath | string | {parentDir}/upload | 文件上传目录,供上传下载使用 |
ipAccessFilter | string | true | IP访问过滤器,设为 false 可关闭 |
nacos_namespace | string | DEFAULT | Nacos服务注册命名空间 |
nacos_config_dataid | string | MES | Nacos配置中心数据ID |
代码中读取配置:
// 方式1:通过EngineContext
var config = EngineContext.Current.GetConfig("AppSettings:backgroudJob");

// 方式2:通过IConfiguration
var config = EngineContext.Current.Resolve<IConfiguration>();
var value = config.GetSection("AppSettings:uploadPath").Get<string>();
2. ConnectionStrings - 连接字符串
| 配置项 | 必填 | 说明 |
|---|---|---|
redis | ✅ | Redis连接字符串,用于缓存、SignalR、服务注册 |
rabbitmq | 否 | RabbitMQ连接字符串,用于事件总线(不配则使用Redis) |
masterdb | ✅ | 主数据库连接,用户、角色、资源等 |
influxdb | 否 | InfluxDB时序数据库连接(监控指标) |
| 其他dbkey | 否 | 自定义数据库连接(如 salesdb, stockdb) |
Redis连接格式:
{host}:{port},password={password}
示例:10.11.5.49:6379,password=redis123!
RabbitMQ连接格式:
amqp://{user}:{password}@{host}:{port}/{vhost}
示例:amqp://mes:bjhhg@10.11.5.57:5672/dev
数据库连接格式:
{Provider}://{ConnectionString}支持的Provider:
| Provider名称 | 数据库类型 |
|---|---|
Oracle.Managed | Oracle(推荐) |
Oracle | Oracle(旧驱动) |
PostgreSQL | PostgreSQL |
MySql.Data / MySqlConnector | MySQL |
System.Data.SqlClient | SQL Server |
System.Data.SQLite | SQLite |
Oracle连接示例:
Oracle.Managed://User Id=gzmes;Password=gzmes,-123;Data Source=10.11.5.47/RMESCDB;Pooling=true;Min Pool Size=1;Max Pool Size=10;PostgreSQL连接示例:
PostgreSQL://Server=xxx.cn;Port=55432;Database=xxx;User Id=xxx;Password=xxx;多数据库配置:
"ConnectionStrings": {
    "masterdb": "Oracle.Managed://User Id=c##rmes;Password=xxx;Data Source=10.0.0.1/ORCLCDB;",
    "salesdb": "Oracle.Managed://User Id=sales;Password=xxx;Data Source=10.0.0.2/ORCLCDB;",
    "stockdb": "PostgreSQL://Server=stock.db.cn;Port=5432;Database=stock;User Id=xxx;Password=xxx;"
}
代码中获取数据库连接:
// 获取默认masterdb连接
var db = GetDbContext();

// 获取自定义数据库连接
var salesDb = GetDbContext("salesdb");
var stockDb = GetDbContext("stockdb");注意:连接字符串支持AES加密,框架会自动尝试解密。
3. OpenAI - AI助手配置
用于AI智能助手服务(AIMind),配置大语言模型接入。
| 配置项 | 说明 |
|---|---|
ApiKey | API密钥 |
ModelId | 模型ID,如 oc/deepseek-v4-flash-free |
Endpoint | API端点地址 |
"OpenAI": {
    "ModelId": "oc/deepseek-v4-flash-free",
    "Endpoint": "https://mimo.rv.com.cn/v1",
    "ApiKey": "sk-5d3e3554632ebc31-vvb4zt-23d4e3f2"
}
4. 其他配置
| 配置项 | 说明 |
|---|---|
Urls | 服务监听地址,格式 http://0.0.0.0:{port} |
AllowedHosts | 允许的主机,* 表示允许所有 |
环境配置
支持通过环境变量或文件覆盖配置:
appsettings.Development.json- 开发环境appsettings.Production.json- 生产环境
配置优先级
环境变量 > 命令行参数 > 环境配置文件 > 默认 appsettings.json
ORM工具实战
定义实体
using Hmx.Core;
using Hmx.Core.Data;
using Hmx.Core.Enums;
using System;

namespace Hmx.Service.Admin.Entities
{
    /// <summary>
    /// 用户表
    /// </summary>
    public partial class HmxUser : HmxEntity, IHmxFullAuditedEntity
    {
        /// <summary>
        /// 用户Id
        /// </summary>
        [LDisplay("用户Id")]
        public override string Id { get; set; }

        /// <summary>
        /// 用户名
        /// </summary>
        [LDisplay("用户名")]
        public virtual string CUserName { get; set; }

        /// <summary>
        /// 密码
        /// </summary>
        [LDisplay("密码")]
        public virtual string CPassword { get; set; }

        /// <summary>
        /// 时间戳
        /// </summary>
        [LDisplay("时间戳")]
        public virtual DateTime CTimestamp { get; set; }

        /// <summary>
        /// 创建人
        /// </summary>
        [LDisplay("创建人")]
        public virtual string Creator { get; set; }

        /// <summary>
        /// 最后更新人
        /// </summary>
        [LDisplay("最后更新人")]
        public virtual string LastModifier { get; set; }

        /// <summary>
        /// 创建时间
        /// </summary>
        [LDisplay("创建时间")]
        public virtual DateTime? CreateTime { get; set; }

        /// <summary>
        /// 最后更新时间
        /// </summary>
        [LDisplay("最后更新时间")]
        public virtual DateTime? LastModifyTime { get; set; }
    }
}
几点重要说明:
- 所有的实体必须继承HmxEntity
- 如果你需要审计日志支持,可选继承IhmxFullAuditedEntity
- 实体一般放置在接口协议层,可以和前端打交道,有必要的情况,可以放后端,交互使用DTO
- Ldisplay用于表格列的自动描述展示
建立映射
using Hmx.Http.Core.Data.Linq2db;
using Hmx.Service.Admin.Entities;
using LinqToDB.Mapping;

namespace Hmx.Service.Admin.Domain.Mappings
{
    public partial class HmxUserMapping : ILinq2dbFluentEnityMapping
    {
        public void Configure(FluentMappingBuilder model)
        {
            model.Entity<HmxUser>()
                .HasTableName("HMX_USER")
                .HasPrimaryKey(x => x.Id)
                .Property(x => x.Selected).IsNotColumn()
                .Property(x => x.Id).HasColumnName("ID")
                .Property(x => x.CPassword).HasColumnName("C_PASSWORD")
                .Property(x => x.CTimestamp).HasColumnName("C_TIMESTAMP")
                .Property(x => x.CUserName).HasColumnName("C_USER_NAME")
                .Property(x => x.Creator).HasColumnName("C_CREATOR")
                .Property(x => x.LastModifier).HasColumnName("C_LAST_MODIFIER")
                .Property(x => x.CreateTime).HasColumnName("D_CREATE_TIME")
                .Property(x => x.LastModifyTime).HasColumnName("D_LAST_MODIFY_TIME");
        }
    }
}
几点重要说明:
- 没有采取attribute方式映射,而是采取mapping类的形式
- 映射类必须继承ILinq2dbFluentEnityMapping 并且实现
- 映射类必须放置在后端项目中,框架会自动扫描
获取连接
/// <summary>
/// 基础后台服务示例
/// </summary>
public class DemoAppService : HmxAppServiceBase<DemoAppService>, IDemoAppService
{
    /// <summary>
    /// 获取数据库时间
    /// </summary>
    public async Task<DateTime> GetDataBaseTime()
    {
        var db = GetDbContext() as HmxLinq2dbDataRepository;
        var dtime = db.GetDataConnection().Select(() => Sql.CurrentTimestamp);

        return await Task.FromResult(dtime);
    }
}
几点重要说明:
- 所有的数据库操作都在XXXAppService里面,定义的XXXAppService都需要继承HmxAppServiceBase<T>
- 所有的XXXAppService 都必须继承一个接口,该接口供前端使用,名称为 IXXXAppService
- 所有的数据库连接的获取从GetDbContext() 开始,这个方法有一个参数dbkey,和连接字符串对应
- protected IHmxDataRepository GetDbContext(string dbkey = "masterdb")
"ConnectionStrings": {
    "redis": "10.11.5.52:6379",
    "rabbitmq": "amqp://mes:bjhhg@10.11.5.57:5672/dev",
    "influxdb": "http://ddh:222-33333334434343==@10.11.5.59:8086",
    "masterdb": "Oracle://User Id************2*",
    "salesdb": " Oracle://User Id************3*",
    "stockdb": " Oracle://User Id*************4"
}
按列查询
大多数情况下,我们会从数据库中获取整行:
from p in db.Product where p.ProductID == 5 select p;
不过,有时候收集所有字段太浪费,所以我们只想用特定的字段,但仍然使用我们的POCOs;这对依赖对象跟踪的库来说是个挑战,比如LINQ转SQL的库。
from p in db.Product orderby p.Name descending
select new Product
{
    Name = p.Name
};
组合查询
我们不必串接字符串,而是可以"组合"LINQ表达式。在下面的示例中,最终的 SQL 是真还是假,或者如果不是空,会有所不同。
public static Product[] GetProducts(bool onlyActive, string searchFor)
{
    using var db = new DbNorthwind();

    var products = from p in db.Product select p;

    if (onlyActive)
    {
        products = from p in products where !p.Discontinued select p;
    }

    if (searchFor != null)
    {
        products = from p in products where p.Name.Contains(searchFor) select p;
    }

    return products.ToArray();
}
分页查询
很多时候,我们需要编写只返回整个数据集子集的代码。我们对之前的例子进行了扩展,展示产品搜索功能可能的样子。
请记住,下面的代码会对数据库进行二次查询。一次是查找记录总数,这是许多分页控制的要求,一次是返回实际数据。
public static List<Product> Search(string searchFor, int currentPage, int pageSize, out int totalRecords)
{
    using var db = new DbNorthwind();

    var products = from p in db.Product select p;

    if (searchFor != null)
    {
        products = from p in products where p.Name.Contains(searchFor) select p;
    }

    totalRecords = products.Count();

    return products.Skip((currentPage - 1) * pageSize).Take(pageSize).ToList();
}
关联查询
这假设我们添加了一个类,就像我们对类所做的那样,定义了所有字段,并在数据访问类中定义了表访问性质。我们现在可以写一个类似这样的 INNER JOIN 查询:CategoryProductDbNorthwind
from p in db.Product
join c in db.Category on p.CategoryID equals c.CategoryID
select new Product
{
    Name = p.Name,
    Category = c
};
以及类似这样的LEFT JOIN查询:
from p in db.Product
from c in db.Category.Where(q => q.CategoryID == p.CategoryID).DefaultIfEmpty()
select new Product
{
    Name = p.Name,
    Category = c
};
自定义结果集
在前面的例子中,我们把整个对象分配给我们的产品,但如果我们想要类中的所有字段,但又不想手动指定每个字段呢?遗憾的是,我们 无法 写出这样的内容:CategoryProduct
from p in db.Product
from c in db.Category.Where(q => q.CategoryID == p.CategoryID).DefaultIfEmpty()
select new Product(c);
上述查询假设 Product 类有一个构造子接受对象。上述查询无法正常工作,但 我们可以通过 以下查询来绕过:Category
from p in db.Product
from c in db.Category.Where(q => q.CategoryID == p.CategoryID).DefaultIfEmpty()
select Product.Build(p, c) ;
为了实现这个功能,我们需要类中有一个函数,看起来像这样:Product
public static Product Build(Product? product, Category category)
{
    if (product != null)
    {
        product.Category = category;
    }

    return product;
}
这种方法的一个注意事项是,如果你用它来处理组合查询(见上文示例),这个部分只能出现在最终选择中。
插入数据
迟早我们需要向数据库添加新文件。一种方法是调用命名空间中的扩展方法;所以一定要导入。ProductInsertLinqToDB
using var db = new DbNorthwind();

db.Insert(product);
这会插入我们类中的所有列,但不会获取生成的身份值。为此,我们可以使用如下方法:ProductInsertWith*Identity
using var db = new DbNorthwind();

product.ProductID = db.InsertWithInt32Identity(product);
还有一种方法是如果数据库记录是通过主键找到的,则会更新,否则会添加记录。InsertOrReplace
如果你只需要插入某些字段,或者使用数据库生成的值,你可以写:
using var db = new DbNorthwind();

db.Product
    .Value(p => p.Name, product.Name)
    .Value(p => p.UnitPrice, 10.2m)
    .Value(p => p.Added, () => Sql.CurrentTimestamp)
    .Insert();
使用该方法还允许我们构建如下插入语句:
using var db = new DbNorthwind();

var statement = db.Product
    .Value(p => p.Name, product.Name)
    .Value(p => p.UnitPrice, 10.2m);

if (storeAdded) {
    statement.Value(p => p.Added, () => Sql.CurrentTimestamp);
}

statement.Insert();
更新数据
更新记录的模式与 类似。我们有一个扩展方法,可以更新数据库中的所有列:Insert
using var db = new DbNorthwind();

db.Update(product);
我们还有一个更低级别的更新机制:
using var db = new DbNorthwind();

db.Product
    .Where(p => p.ProductID == product.ProductID)
    .Set(p => p.Name, product.Name)
    .Set(p => p.UnitPrice, product.UnitPrice)
    .Update();
同样,如果需要,我们可以将更新查询拆分成多个部分:
using var db = new DbNorthwind();

var statement = db.Product
    .Where(p => p.ProductID == product.ProductID)
    .Set(p => p.Name, product.Name);

if (updatePrice) statement = statement.Set(p => p.UnitPrice, product.UnitPrice);

statement.Update();
你不局限于单一记录更新。例如,我们可以停产所有已停产的产品:
using var db = new DbNorthwind();

db.Product
    .Where(p => p.UnitsInStock == 0)
    .Set(p => p.Discontinued, true)
    .Update();
删除数据
和更新记录类似,你也可以删除记录:
using var db = new DbNorthwind();

db.Product
    .Where(p => p.Discontinued)
    .Delete();
批量复制
批量复制功能支持将大量数据从其他数据源传输到表中。
var list = new List<ProductTemp>();

// ... populate list ...

using var db = new DbNorthwind();

db.BulkCopy(list);
事务处理
注意:下面的内容均为原理解释,实际上事务已经在框架中封装,开发无需感知。
你可以理解为每个请求就是一个事务范围,他会自动的提交事务或者回滚事务,当遇到异常的时候。
使用数据库事务非常简单。你只需调用你的 ,运行一个或多个查询,然后通过调用 提交更改。如果发生了什么需要回滚更改,你可以调用或抛出例外。BeginTransaction() DataConnectionCommitTransaction() RollbackTransaction()
using var db = new DbNorthwind();

db.BeginTransaction();

// or
// using var tr = db.BeginTransaction();

// ... select / insert / update / delete ...

if (somethingIsNotRight)
{
    db.RollbackTransaction();
    // or
    // tr.Rollback();
}
else
{
    db.CommitTransaction();
    // or
    // tr.Commit();
}
另外,你也可以用 .NET 内置的类:TransactionScope
using var transaction = new TransactionScope();

// or for async code
// using var transaction = new TransactionScope(TransactionScopeAsyncFlowOption.Enabled);

using var db = new DbNorthwind();

// ...

transaction.Complete();
需要注意的是,你的"上下文"类有两个基类:和。它们之间的关键区别在于连接保持的行为。 打开连接,并保持连接直到 dispose 发生。
它的行为和你以前用Entity Framework时一样:每次查询都打开连接,查询完成后马上关闭连接。LinqToDB.Data.DataConnectionLinqToDB.DataContextDataConnectionDataContext
这种行为差异在与以下情况一起使用时尤为重要:TransactionScope
using var db = new LinqToDB.Data.DataConnection("provider name", "connection string");

var product = db.GetTable<Product>()
    .FirstOrDefault(); // connection opened here

var scope = new TransactionScope();

// this transaction was not attached to connection
// because it was opened earlier

product.Name = "Lollipop";

db.Update(product);

scope.Dispose();

// no transaction rollback happed, "Lollipop" has been saved
A在开启时即与环境交易挂钩。连接建立后生成的任何 s 都不会影响连接。
在之前代码中替换为 ,交易范围将如预期般工作:创建的记录将随交易一同丢弃。
DataConnectionTransactionScopeDataConnectionDataContext
虽然看起来是正确的职业,但强烈建议使用。其默认行为可以通过将属性设置为
DataContextDataConnectionCloseAfterUsetrue
public class DbNorthwind : LinqToDB.Data.DataConnection
{
    public DbNorthwind() : base("Northwind")
    {
        (this as IDataContext).CloseAfterUse = true;
    }
}
更多内容
发布与部署
重点:我们的后端基于.net10,前端winform也是,所以我们的后端服务器可以选择不同的操作系统,比如linux和windows。
而且现在因为跨平台我们也不依赖IIS了,完全独立的采取windows服务部署。
假设远程服务器的目标文件夹为:D:\mes-apps ,这个文件夹里面我们一般会放如下内容:
Mode LastWriteTime Length Name
---- ------------- ------ ----
d----- 2026/6/12 16:34 api // 后端服务和前端winform更新
d----- 2025/8/26 15:13 apks // 移动端apk文件
d----- 2025/12/3 15:20 logs // 后端统一日志目录
d----- 2025/9/1 14:48 nginx // 后端nginx服务
d----- 2025/11/29 22:04 promtail // 后端日志采集器
d----- 2025/8/16 9:40 report // 后端报表服务
d----- 2025/12/23 11:07 upload // 各种安装文件临时文件
d----- 2025/8/4 15:12 web // hmxweb服务静态文件
本章节我们主要讲 api目录的发布与部署。
手动部署的情形下,我们在自己的开发工具通过publish分别完成前端和后端的文件的发布到文件夹。
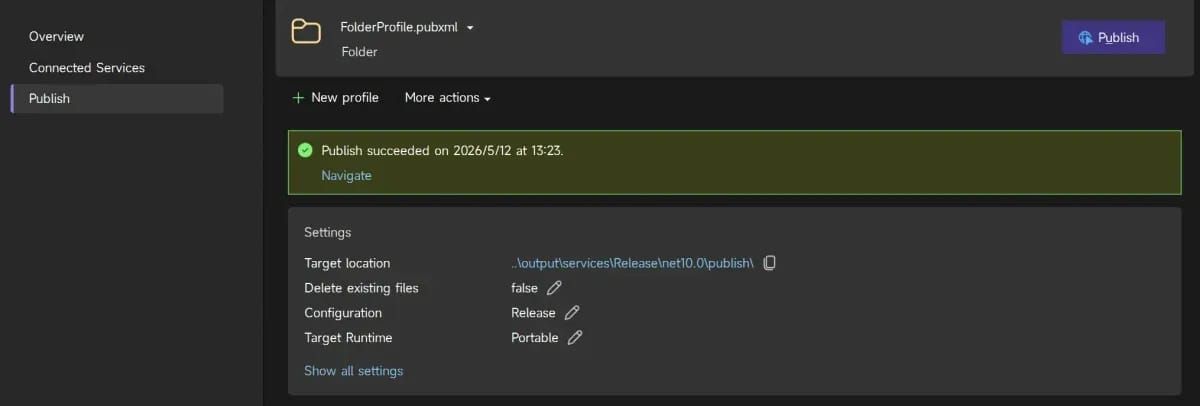
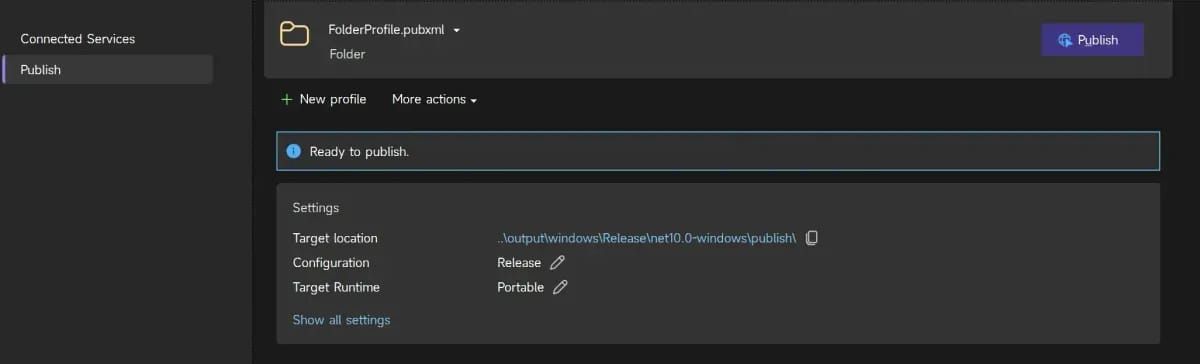
发布完成把d:\gitrepos\hmx\admin\output\windows\release\net10.0-windows\publish放到
d:\gitrepos\hmx\admin\output\services\release\net10.0\publish\update 目录进行合并,这样前后端就集成到一起了,
这么做是因为使用了内置的自动更新服务。【参考自动更新章节】
然后把d:\gitrepos\hmx\admin\output\services\release\net10.0\publish 文件夹里面的内容复制到服务器端的:
D:\mes-apps\api 目录;
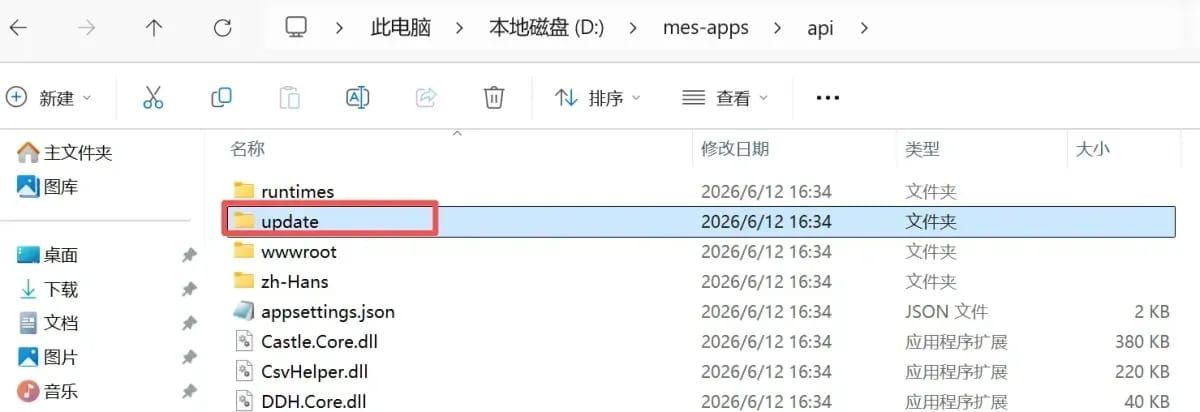
找到你的后端启动程序,Hmx.Service.Startup.exe 直接打开,后端服务就运行成功了。
下一步,我们需要把他改造为windows服务,而不是一个console命令行运行;
NSSM - the Non-Sucking Service Manager
用这个工具就行了,具体的教程可以在网络上寻找。
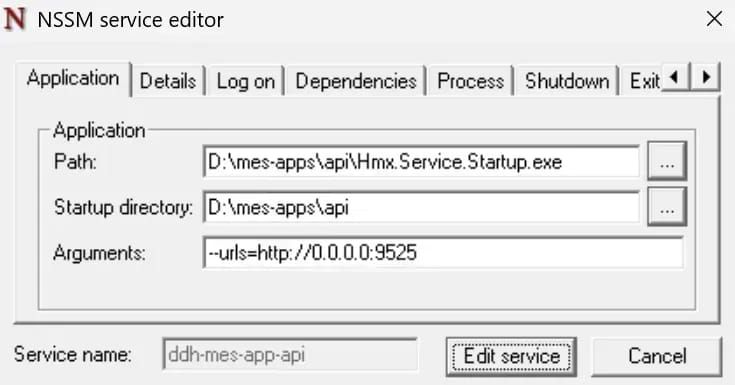
继续,我们不可能每次发布都这么手工操作一遍,所以需要devops持续拉取代码自动生成自动发布;
main-pipelines.yml
trigger: none

pool:
  name: default

variables:
  - group: deploy_secrets_tqmes_DEV

stages:
  - stage: Build
    displayName: 编译构建
    jobs:
      - job: BuildJob
        displayName: 编译 MES 项目(DEV)
        steps:
          - checkout: self
            submodules: true
            clean: true

          - task: PowerShell@2
            displayName: 'Nuget包还原'
            inputs:
              targetType: 'inline'
              script: |
                dotnet restore tqmes.startup.all.sln --configfile "D:/AzureAgent/_work/nuget.config"

          # Publish 后端服务项目
          - task: DotNetCoreCLI@2
            displayName: 'Publish Services'
            inputs:
              command: 'publish'
              projects: 'startups/DDH.TQMES.Service.Startup/DDH.TQMES.Service.Startup.csproj'
              publishWebProjects: false
              zipAfterPublish: false
              arguments: >
                --configuration Release --no-restore
                /p:PublishDir="$(Build.SourcesDirectory)\output\publish\services"

          # Publish 前端 WinForms 项目
          - task: DotNetCoreCLI@2
            displayName: 'Publish WinForms'
            inputs:
              command: 'publish'
              projects: 'startups/DDH.TQMES.Winform.Startup/DDH.TQMES.Winform.Startup.csproj'
              publishWebProjects: false
              zipAfterPublish: false
              arguments: >
                --configuration Release --no-restore
                /p:PublishDir="$(Build.SourcesDirectory)\output\publish\winforms"
                /p:UseAppHost=true

          # 调用统一的 post-build 处理模板(DEV 环境)
          - template: pipelines-scripts-post-build-process.yml
            parameters:
              cfgStartup: 'DDH.TQMES.Winform.Startup'  # 前端启动程序名
              cfgEnv: 'DEV'                             # DEV 环境,会自动使用 -dev.config.json

          # 发布构建产物
          - task: PublishBuildArtifacts@1
            displayName: '发布构建产物'
            inputs:
              PathtoPublish: '$(Build.SourcesDirectory)\output\publish'
              ArtifactName: 'drop'
              publishLocation: 'Container'

  - stage: Deploy
    displayName: 部署测试服务器
    dependsOn: Build
    jobs:
      - job: DeployServer1Service
        displayName: 部署到测试服务器49
        steps:
          - template: pipelines-scripts-deploy-service.yml
            parameters:
              serverIp: $(SERVER_A_IP)
              username: $(SERVER_A_USER)
              password: $(SERVER_A_PWD)
              serviceName: ddh-tqmes-app-api
pipelines-scripts-post-build-process.yml
parameters:
  - name: cfgStartup       # 启动程序名(不含 .exe),例如 DDH.TQMES.Winform.Startup
    type: string
    default: 'DDH.TQMES.Winform.Startup'
  - name: cfgEnv           # 环境:PRD 或 DEV(带前缀避免冲突)
    type: string
    default: 'PRD'

steps:
  - task: PowerShell@2
    displayName: '处理编译后文件'
    inputs:
      targetType: 'inline'
      script: |
        $cfgStartup = "${{ parameters.cfgStartup }}"
        $cfgEnv     = "${{ parameters.cfgEnv }}"
        $dropPath   = "$(Build.SourcesDirectory)\output\publish"
        $scriptPath = "$(Build.SourcesDirectory)\scripts"

        # 固定路径(已通过 publish --output 控制)
        $servicesPath = Join-Path $dropPath "services"
        $winformsPath = Join-Path $dropPath "winforms"

        # 启动程序文件名
        $startupExe       = "$cfgStartup.exe"
        $startupSignedExe = "$cfgStartup-signed.exe"
        $buildVersion = "Build_$(Get-Date -Format 'yyyyMMdd_HHmmss')"

        Write-Host "=== 开始编译后处理 ==="
        Write-Host "环境: $cfgEnv"
        Write-Host "启动程序: $startupExe"
        Write-Host "版本号: $buildVersion"

        # 写入版本文件
        $buildVersion > (Join-Path $servicesPath "version")
        $buildVersion > (Join-Path $winformsPath "version")

        # 删除不需要的文件
        Get-ChildItem -Path $dropPath -Recurse -Include *.pdb, *.xml, appsettings.json | Remove-Item -Force -ErrorAction SilentlyContinue

        # 复制环境配置文件
        Copy-Item -Path "$scriptPath\app-services-$cfgEnv.config.json" -Destination "$servicesPath\appsettings.json" -Force
        Copy-Item -Path "$scriptPath\app-winforms-$cfgEnv.config.json" -Destination "$winformsPath\appsettings.json" -Force

        # 复制 AutoUpdater
        Copy-Item -Path "$scriptPath\startup\AutoUpdater-signed.exe" -Destination "$winformsPath\AutoUpdater.exe" -Force
        Copy-Item -Path "$scriptPath\startup\AutoUpdater-$cfgEnv.exe.config" -Destination "$winformsPath\AutoUpdater.exe.config" -Force

        # 清理旧的签名临时文件
        Get-ChildItem -Path "$scriptPath\startup" -Include *-signed.exe -Recurse | Remove-Item -Force -ErrorAction SilentlyContinue

        # 代码签名
        $inFile  = Join-Path $winformsPath $startupExe
        $outFile = Join-Path "$scriptPath\startup" $startupSignedExe

        Write-Host "正在签名: $inFile"
        C:\Windows\osslsigncode\osslsigncode sign `
          -pkcs12 "$scriptPath\startup\codesign.pfx" `
          -pass bjhhg `
          -in $inFile `
          -out $outFile

        # 替换回原文件
        Copy-Item -Path $outFile -Destination $inFile -Force

        Write-Host "=== 编译后处理完成 ==="
pipelines-scripts-deploy-service.yml
parameters:
  - name: serverIp
    type: string
  - name: username
    type: string
  - name: password
    type: string
  - name: serviceName
    type: string

steps:
  - task: PowerShell@2
    displayName: '部署到服务器'
    inputs:
      targetType: 'inline'
      script: |
        # 部署脚本内容